
How to Do Polished Concrete Floors: From Grinding to Glossy Finish
You can turn a rough slab into a durable, low‑maintenance glossy floor by grinding, densifying, and polishing in stages. Start by evaluating and repairing the slab, then grind progressively from coarse to fine grits, apply a densifier after mid‑grind, and finish with high‑grit polishing and optional sealers for desired sheen. Use proper tools, PPE, and dust control, and expect DIY projects to take days to weeks depending on size and prep—keep going to get step‑by‑step timing, costs, and tips.
Can You Achieve Polished Concrete Floors and How Long It Takes
You can get polished concrete by moving from an initial assessment and repair, through grinding with progressively finer diamonds, to densifying and a final burnish.
A DIY job can take a weekend to several weeks depending on prep and skill and often costs a few hundred to a few thousand dollars in tools and materials, while pros usually finish in 1–3 days for a single room at a few hundred to several thousand dollars.
We’ll compare typical timeframes and cost ranges so you can decide which route fits your budget and timeline.
Short step summary (from assessment to final burnish)
Before any grinding starts, assess the slab for cracks, coatings, moisture, and levelness so you know what prep and repairs are required. This initial evaluation determines whether you can achieve a true polished finish and roughly how long the project will take.
Follow a concise workflow for how to do polished concrete floors:
- Repair and strip contaminants
- Grind through grits to desired sheen
- Densify, polish, and final burnish to gloss
Typical timeframes and cost ranges for DIY vs professional
Although a DIY enthusiast can often achieve a basic polished look, expect a tradeoff: DIY takes longer and can cost less upfront but risks uneven results.
Plan weekends to several weeks depending on prep and cure times; budget $2–$6 per sq ft for supplies.
Pros finish faster (days), guarantee quality, and charge $5–$15+ per sq ft including labor and equipment.
What Is Polished Concrete and Why Choose It
Polished concrete is a mechanically ground and chemically treated surface available in levels from a matte sheen to a high-gloss mirror finish. You can choose from exposed aggregate, dyed, or stained options.
You’ll get a durable, low-maintenance, attractive, and often more sustainable floor compared with many coverings. However, it’s not ideal where warmth, heavy cushioning, or complete moisture barriers are required, so consider those limits before committing.
Definition and types of polished concrete finishes
Think of polished concrete as a durable, low-maintenance floor finish created by mechanically grinding and honing a concrete slab to a smooth, reflective surface.
You can choose from a range of finishes—from matte to high-gloss, dyed or aggregate-revealing—depending on aesthetic, durability, and maintenance needs.
You’ll pick between mechanically polished, chemically densified, burnished, stained, or exposed-aggregate styles to match appearance and performance requirements.
Benefits: durability, maintenance, aesthetics, sustainability
Now that you know the main types of polished finishes, consider why many homeowners and designers choose this surface: it lasts, asks for little upkeep, looks modern, and supports greener building goals.
You get long-lasting wear, easy cleaning, and a sleek look that boosts light.
Benefits include:
- Exceptional durability and scratch resistance
- Minimal maintenance and simple cleaning
- Improved aesthetics and energy-efficient reflectivity
Limitations and where polished concrete is not ideal
Although it performs well in many settings, polished concrete isn’t the best choice for every space, and you should weigh a few clear limitations before committing.
It can be cold, hard, and slippery when wet; it amplifies noise; repairs or color changes are difficult; and uneven or moisture-prone slabs may need costly prep.
You should consider alternatives for cozy, wet, or historic spaces.
Tools, Materials, and Safety Gear You Need
Before you start, make sure you’ve got the right gear: grinders, polishing pads, densifiers, burnishers, and the consumables like diamond segments, pads, sealers, and patching compounds.
You’ll also need proper safety equipment—respirator, ear and eye protection, gloves—and a site-prep checklist to control dust and traffic.
With the correct tools, materials, and safety measures in place, the polishing process will go faster and safer.
Essential equipment: grinders, polishing pads, densifiers, burnishers
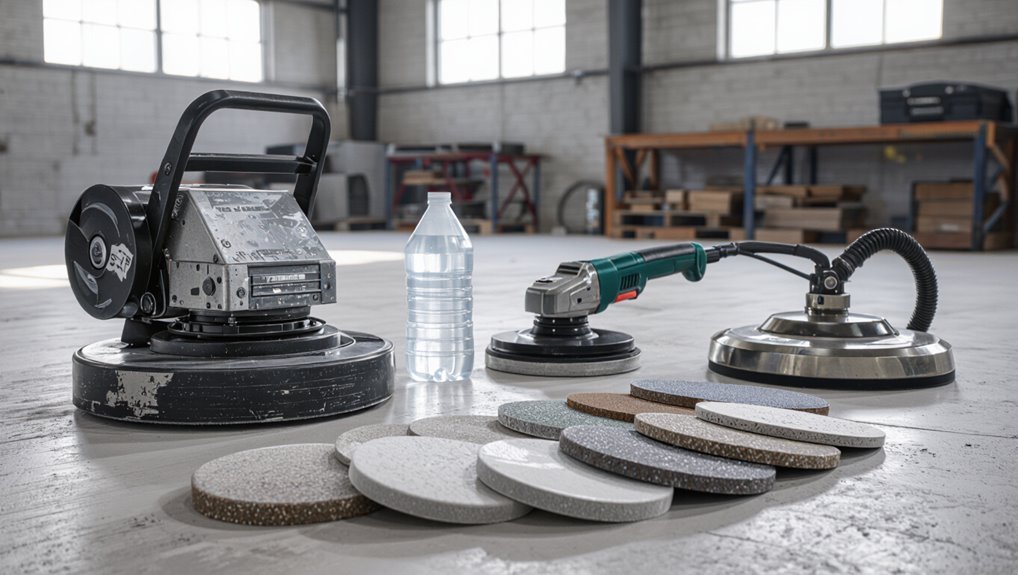
Good equipment makes the difference between a durable, glossy concrete floor and one that looks amateurish; you’ll need grinders, polishing pads, densifiers, and burnishers to get professional results.
Choose a variable-speed planetary or walk-behind grinder for control, matched pad systems for grit progression, a quality chemical densifier for hardening, and a high-speed burnisher for final sheen.
Use PPE and proper power connections.
Consumables and materials: diamonds, pads, sealers, densifiers, patching compounds
Diamond tooling, polishing pads, sealers, densifiers, and patching compounds are the consumables that determine both the process and final look of a polished concrete floor, so you should pick them carefully to match your grinder and the desired sheen.
Choose quality diamonds by grit and bond; match pads to grit progression; use densifier then sealer.
Key items:
- diamond segments
- polishing pads
- densifier/sealer kits
Safety equipment and site preparation checklist
You’ll need a clear checklist of tools, materials, and personal protective equipment before you start polishing so the job stays safe and efficient.
Gather respirator, ear protection, safety goggles, knee pads, gloves, and steel-toe boots.
Clear and mark the area, remove debris, secure ventilation, and check electrical outlets.
- PPE: respirator, goggles, ear protection
- Tools: grinder, vacuum, pads
- Prep: clear, ventilate, secure
Assessing the Concrete Slab Before Polishing
Before you start polishing, inspect the slab for cracks, moisture, levelness, and contaminants so you know what you’re working with.
Test slab hardness and run a moisture vapor emission rate (MVER) test to confirm the surface can take the process.
Based on those results, decide whether to repair, pour a thin overlay, or abort polishing and choose an alternative finish.
Inspecting for cracks, moisture, levelness, and contaminants
Because a polished finish depends on a sound foundation, start by thoroughly inspecting the slab for cracks, moisture, levelness, and contaminants.
Walk the area, mark hairline and structural cracks, check for efflorescence, oil, paint, or adhesive residues, and note low spots or slope issues.
Remove contaminants and document repairs needed before grinding to guarantee an even, durable polish.
Testing slab hardness and moisture vapor emission rate (MVER)
After noting cracks, stains, and level issues, you’ll need to verify the slab’s surface strength and moisture profile before any grinding begins.
Test hardness with a rebound hammer or pull-off adhesion tool, and measure MVER with a calcium chloride test or electronic probe.
Record values, compare to polishing limits, and decide readiness.
- Hardness (rebound/pull-off)
- MVER (calcium/electronic)
- Document results
When to repair, pour overlays, or abort polishing
If tests show soft spots, high moisture, extensive cracking, or surface contamination beyond remediation, you’ll need to decide whether to repair, apply an overlay, or stop the polishing plan altogether.
Inspect slab depth, bond, and structural soundness.
Repair when localized damage; overlay when aesthetics or shallow defects dominate and substrate is stable.
Abort if structural issues or persistent moisture will compromise performance.
Step-by-Step Process to Grind and Polish Concrete
Before you start polishing, you’ll pre-clean and mark the area, then repair cracks and level any defects so you have a sound surface to work on.
Next you’ll coarse grind (30–80 grit) to remove highs and heavy coatings, follow with medium grinding (100–200 grit) to erase scratches and stains, and finish with fine grinding and honing (400–800 grit) for a smooth, even surface.
I’ll walk you through each step’s goals, tools, and technique so you can work efficiently and safely.
Step 1 Pre-clean and mark the area
Start by clearing the space and giving it a quick once-over so you can see trouble spots and plan your work.
Remove furniture, loose debris, and dust with a broom or vacuum.
Degrease oily areas with appropriate cleaner and rinse thoroughly.
Tape off edges and mark zones for grinding, changes, and safety hazards so you know exactly where to focus first.
Step 2 Repair cracks and surface defects (patching and leveling)
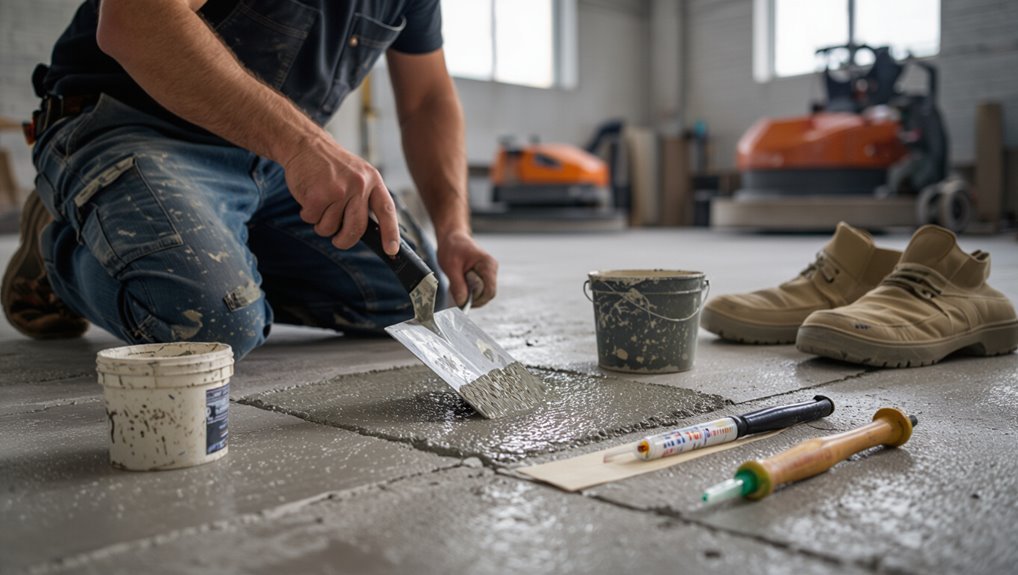
Patch cracks and smooth surface defects so your grinder won’t skip or dig in mid-polish.
Clean debris and widen hairline cracks slightly; apply a compatible epoxy or cementitious patch. Trowel level, feather edges, and remove excess before it sets.
For low spots, use a self-leveling compound.
Let repairs cure fully, then recheck flatness and adhesion before proceeding.
Step 3 Coarse grinding (3080 grit): goals and technique
Kick off coarse grinding with a 30–80 grit sequence to remove surface laitance, open the concrete’s aggregate, and flatten any remaining high spots so the polishing stages can work evenly.
Use a planetary or walk-behind grinder, keep consistent overlapping passes, control speed and pressure, and vacuum continuously.
Inspect for deep pitting or heavy residues; address them before moving to medium grits.
Step 4 Medium grinding (100200 grit): removing scratches and stains
Once coarse grinding has opened the aggregate and flattened high spots, move into the 100–200 grit sequence to erase the deeper scratches and lighten surface stains left behind.
You’ll run medium diamonds methodically, overlap passes, and keep the pad flat.
Monitor progress, clean slurry often, and adjust pressure or speed to remove haze and embedded debris before you shift to finer honing.
Step 5 Fine grinding and honing (400800 grit)
Move into the 400–800 grit sequence to refine scratches left by medium grinding and begin developing the sheen that leads into polishing.
You’ll use progressively finer diamond pads, keep speeds moderate, and maintain even passes.
Control dust or use wet methods as needed.
Inspect frequently for uniformity, edge changes, and remaining imperfections before moving to the next stage.
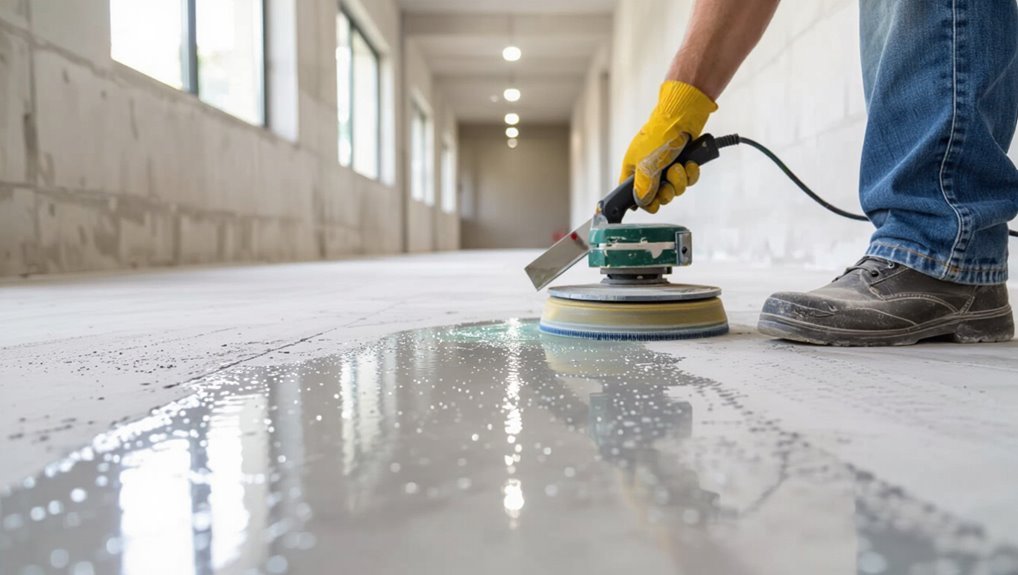
Step 6 Apply densifier/penetrating hardener: types and timing
After you’ve finished the 400–800 grit pass, apply a densifier or penetrating hardener to chemically strengthen the surface and lock in the grinding work you’ve done.
Choose sodium, lithium, or potassium formulations based on cure time and substrate pH.
Spray or flood-apply evenly, allow recommended dwell and absorption, then remove excess.
Wait manufacturer-specified cure before proceeding to final polishing.
Step 7 Polishing passes (8003000 grit): sequence and buffing tips
Start the polishing sequence with 800-grit diamonds and work progressively up through 3,000 grit, keeping your passes overlapping and your speed consistent so you don’t leave swirl marks or uneven gloss.
Change pads incrementally, inspect surface between steps, and remove haze with neutral pads.
Use light buffing at the final grit, keeping dust controlled and edges hand-polished for uniform reflection.
Step 8 Optional stain, dye, or aggregate exposure techniques
1 choice you’ll make at this stage is whether to add color or reveal more aggregate; optional stains, dyes, and deeper grinding to expose aggregate let you customize the floor’s look while the surface is still receptive to treatment.
Decide color type (acid or water-based), test small areas, control grind depth for desired aggregate exposure, and neutralize/clean thoroughly before proceeding with final polishing.
Step 9 Apply guard coats or topical sealers if required
While your polished concrete may already look finished, you’ll apply guard coats or topical sealers when extra surface protection or a specific sheen is needed.
These products sit on top of the polish to guard against staining, abrasion, and chemical damage. You’ll clean thoroughly, choose compatible sealer (acrylic, urethane, or epoxy), apply evenly with a roller or sprayer, and allow proper curing between coats.
Step 10 Final burnish and quality inspection
Before you call the job done, give the floor a final burnish and conduct a thorough quality inspection to guarantee uniform sheen, smoothness, and defect-free surfaces.
You’ll buff at high RPM, inspect under varied lighting, and mark touch-up areas.
Follow this checklist:
- Check sheen consistency across entire floor
- Verify surface smoothness and absence of scratches
- Confirm treated joints and repairs blend seamlessly
Variations and Finish Levels
You’ll choose a finish level—matte, satin, glossy, or high-gloss—by selecting grit progression and densifier timing to achieve the exact sheen you want.
You can also opt for exposed aggregate for texture or a full-polish for a seamless look, each requiring different grinding depth and resin choices.
Remember to adjust methods for interior versus exterior use, since weather, traffic, and sealing needs change the approach.
Matte, satin, glossy, and high-gloss how to achieve each
When you choose a finish—matte, satin, glossy, or high-gloss—you’re deciding how light, texture, and durability will interact in the final floor; each level requires different grinding grit sequences, densifier use, and polishing steps to get the desired look and performance.
For matte stop at lower grits and light densifier; satin goes further with 400–800 grit; glossy requires 1500–3000 grit plus full densification; high-gloss adds burnishing and more polish passes.
Exposed aggregate vs full-polish look
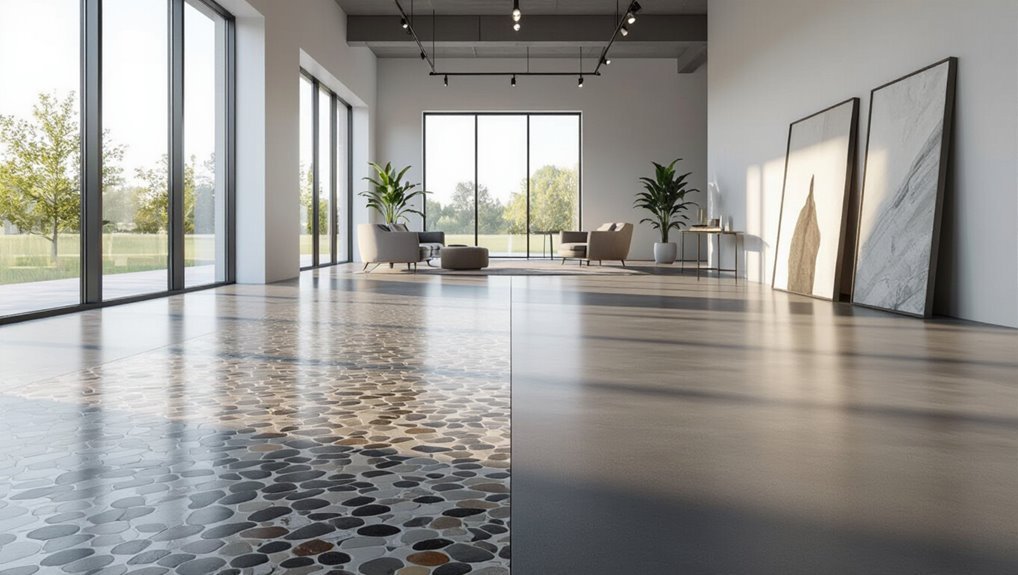
Texture matters: choosing between an exposed-aggregate and a full-polish finish determines how much raw stone shows through, how reflective the floor will be, and how much prep and protection you’ll need.
You’ll pick exposed aggregate for texture, grip, and visual depth with less sheen.
Choose full polish for smooth, mirror-like reflection and easier cleaning, though it demands finer grinding and stronger sealers.
Interior vs exterior considerations
Because interior and exterior environments stress polished concrete differently, you’ll need to tailor finish levels and treatments to each setting.
Indoors, aim for higher grit and gloss for aesthetics and easy cleaning; sealers can boost stain resistance.
Outdoors, pick lower gloss, slip-resistant aggregates, weatherproof densifiers, and UV-stable sealers to withstand freeze-thaw, abrasion, and moisture.
Plan maintenance accordingly.
Common Problems and How to Fix Them
You’ll run into issues like visible scratches, haze, or uneven gloss—each has distinct causes and fixes such as regrinding, adjusting grits, or buffing with the right pad.
Check for efflorescence, stains, or moisture by testing pH and moisture vapor emission, then use targeted cleaners, injections, or moisture mitigation systems.
Prevent delamination and sealer failure by following proper surface prep, using compatible products, and repairing any bonded layers promptly.
Visible scratches, haze, or inconsistent gloss causes and remedies
When scratches, haze, or uneven gloss show up on a polished concrete floor, they usually point to issues with preparation, abrasive sequence, or contamination during polishing; identifying which one you’re dealing with lets you choose the right remedy and avoid rework.
Inspect, then act:
- Recut with finer diamonds to remove scratches and blend sheen.
- Clean thoroughly to eliminate dust, slurry, or residues causing haze.
- Reapply densifier/seal and burnish for uniform gloss.
Efflorescence, staining, or moisture issues diagnosis and repair
If efflorescence, stubborn stains, or persistent moisture problems appear on your polished concrete, don’t assume a cosmetic fix will suffice—these issues signal chemical or moisture movement that can compromise the finish and indoor air quality.
Test moisture with a calcium chloride kit and probe for salts. Remove efflorescence with gentle scrubbing and neutralizing cleaners, treat stains with appropriate poultices, and address source moisture before refinishing.
Delamination or sealer failures prevention and corrective steps
After handling moisture and salt issues, watch for delamination or sealer failures—these show up as peeling, flaking, or areas that suddenly lose shine and can let moisture and contaminants attack the slab.
Prevent issues by ensuring proper surface prep, using compatible primers/sealers, and allowing full cure.
To fix failures, remove delaminated material, grind to sound concrete, clean, then apply correct primer and sealer.
Best Practices, Tips, and Time-Saving Strategies
Start by following an efficient grinding sequence and choosing pads that match your concrete and desired finish to save time and wear.
Use dust control systems and proper slurry management to keep the site clean and speed up shifts between steps.
Finally, set a simple maintenance plan with recommended cleaners and routines so the polish lasts for years.
Efficient grinding sequences and pad selection tips
Plan your grinding sequence around concrete condition, desired sheen, and available equipment to cut time and avoid rework.
You’ll progress systematically from coarse to fine, matching pad type to grit and machine.
Use these quick tips:
- Start with diamond resin for heavy removal, then switch to metal-bond.
- Match grit jumps to avoid chatter.
- Change pads proactively to maintain cutting efficiency.
How to minimize dust and control slurry
When you manage dust and slurry proactively, you’ll protect workers, speed cleanup, and keep your finish consistent; use a combination of dust-extraction grinders, water control, and proper sequencing to cut airborne particles and slurry volume at the source.
Hook vacuums to grinders, use minimal water to form pumpable slurry, collect and remove slurry frequently, and isolate work zones to prevent cross-contamination.
Maintenance plan to keep polish for years (cleaning products and procedures)
Because polished concrete keeps looking its best only with regular attention, you should adopt a simple, consistent maintenance routine that combines the right products with proper techniques.
Sweep daily with a microfiber dust mop. Mop weekly using pH-neutral cleaner diluted per label. Spot-clean spills promptly, and use non-abrasive pads.
Reapply a maintenance sealer every 1–3 years and protect high-traffic areas with mats.
DIY vs Hiring a Pro Decision Guide
Decide whether you’ll tackle polishing yourself by honestly evaluating your skill level, the cost of renting or buying grinders and pads, and the hidden expenses that add up.
If you spot red flags like deep cracks, heavy contamination, or uneven slabs, you’ll want a contractor with the right experience and insurance.
When you hire someone, ask for specific credentials, a portfolio of similar jobs, and references you can call.
Skill level, equipment investment, and hidden costs comparison
If you’ve never worked with grinders, diamond pads, or densifiers before, polishing concrete is a big step up from basic DIY jobs and demands a steep learning curve, specialized tools, and time you might not have. You’ll weigh skill, equipment purchase/rental, and hidden costs (repairs, dust control, chemicals).
| Factor | DIY | Pro |
|---|---|---|
| Skill required | High | Low |
| Upfront cost | Moderate–High | Low |
| Risk/hidden cost | High | Lower |
When to hire a contractor: red flags and complexity thresholds
You’ve weighed skill, equipment, and hidden costs; now look for clear signs that hiring a pro will save you time, money, and headaches.
Hire if the slab has extensive cracks, severe leveling issues, moisture problems, or complex overlays.
Also consider pros for large areas, tight timelines, or when achieving high-gloss, uniform finish matters.
If unsure, don’t risk costly mistakes.
How to vet and compare contractors (questions, credentials, references)
How will you know a contractor is the right fit? You’ll ask targeted questions, verify credentials, and check references. Focus on experience with polished concrete, insurance, and warranties.
Compare bids for scope and materials, not just price.
- Ask for project photos and references
- Verify license, insurance, and certification
- Get a detailed, written proposal and timeline
Cost Breakdown and Budgeting Tips
You’ll want to break costs into components—materials, tooling, surface prep, labor, and sealing—whether you’re doing it yourself or hiring a pro.
Expect common price ranges per square foot for basic, mid, and high-gloss finishes so you can compare quotes and plan your budget.
I’ll also show practical ways to cut expenses—like batching rooms, prepping carefully, and choosing cost-effective sealers—without sacrificing quality.
Typical cost components for DIY and professional jobs
A clear budget starts by breaking the job into line items so you know what to buy, rent, or hire: materials (grind diamonds, sealers, densifiers, patch), equipment (grinders, vacuums, polishers, safety gear), labor (your time or contractor rates), surface prep (crack repair, profile work), and finishing (stain, guard coats, cleanup).
Estimate each item, factor in rental vs. purchase decisions, contingency, and disposal fees.
Cost examples per square foot for common finish levels
When planning costs per square foot, think in tiers: basic grind-and-seal, mid-range polished with densifier, and high-gloss multi-step polishing with stains or aggregates.
Expect about $1–$3 for DIY seal-only basic, $3–$8 for contractor basic grind-and-seal, $5–$12 for mid-range polished with densifier, and $8–$20+ for high-gloss customized finishes including staining or exposed aggregate.
Ways to reduce cost without sacrificing quality
If you want to cut costs without cutting quality, focus on smart planning and prioritized upgrades: pick the right finish level for the space, batch similar areas to reduce mobilization, schedule work in fair weather to avoid moisture remediation, and choose durable densifiers and sealers that lower long‑term maintenance.
Negotiate fixed bids, buy consumables in bulk, reuse equipment when safe, and inspect substrate thoroughly to avoid surprises.
FAQ
You probably have a few practical questions about polished concrete—how long it lasts, whether it can go over existing tiles, and if it’ll be slippery.
You’ll also want to know how soon you can use the floor after polishing and whether the shine level can be changed later.
Below are clear answers to those common concerns.
How long does polished concrete last?
How long will polished concrete last? You can expect decades of service—often 20–30 years or more—if you maintain it.
Regular cleaning, occasional resealing or reapplication of a topical finish, and prompt repair of damage extend life.
Heavy industrial use may shorten intervals between maintenance, while gentle residential use can keep floors attractive and functional for generations.
Can polished concrete be installed over existing tiles or other floorings?
Wondering whether polished concrete can go over existing tile or vinyl? You can in some cases, but surfaces must be sound, level, and well-bonded.
Loose tiles, adhesive residue, or uneven changes need removal or leveling. Thin overlays or self-leveling compounds can create a suitable substrate.
Always test adhesion, consult a pro, and expect added prep time and cost compared with polishing exposed concrete.
Will polishing concrete make the floor slippery?
Will polishing concrete make your floor slippery? Not necessarily — polished concrete’s slipperiness depends on finish level, sealers, and contaminants.
Higher gloss and certain topical sealers can increase slip potential, especially when wet. You can control traction by choosing a lower sheen, applying anti-slip additives, or using textured finishes.
Regular cleaning prevents buildup that reduces grip. Assess planned use and slip-rating needs first.
How soon after polishing can the floor be used?
When can you start walking on and using a polished concrete floor?
You can usually walk on it within a few hours after final polishing, but avoid heavy traffic, furniture, or equipment for 24–48 hours to let densifiers and topical treatments cure.
For full chemical resistances or sealers to reach maximum strength, wait as instructed by the product—often 3–7 days.
Can I change the shine level later?
Yes — you can change the shine level later, and you’ve got two main ways to do it: re-polish with different grit steps to increase gloss, or apply/strip topical coatings to raise or lower the sheen.
You can also dull a glossy floor by light sanding or using a matte sealer. Expect some color shift and prep time; consult pros for large areas.
Visual Guide and Resources
You’ll find step-by-step photos and short how-to videos helpful for matching each polishing stage to the right technique.
Refer to a concise product and tool list (specific grinder models, diamond grit ranges, sealers, and pads) so you can shop with confidence.
Keep this section as a go-to checklist you can follow on the job.
Recommended photo and video references for each step
Photos and short clips make each polishing step easier to follow, so I’ve curated clear visual references you can pause, replay, and compare to your own progress.
For each stage—prep, grinding, honing, polishing, densifying, and final buff—use close-ups of diamond pads, surface textures, dust control, edge work, and wet vs. dry results.
Include short time-lapse sequences showing full passes.
Product and tool resource list (brands/types to consider)
A compact, well-chosen toolkit makes polishing concrete faster and gives more consistent results, so pick products you trust and match them to your floor’s condition and project scale.
You’ll need reliable grinders, diamonds, and finishing supplies—consider brands like HTC, Husqvarna, Diamatic, and Tenax for consumables. Prioritize durability, warranty, and local support.
- Planetary grinders and dust extractors
- Progressive diamond pads (50–3000 grit)
- Densifiers, sealers, and cleaners