
How to Clean Old Floor Tiles and Bring Them Back to Life
You can bring old floor tiles back to life with the right prep, cleaners, and a bit of elbow grease. First identify the tile type, sweep and vacuum, then test a mild cleaner in a hidden spot. Use pH-neutral solutions for stone, gentle detergents for vinyl, and stronger cleaners for ceramic or porcelain as needed. Scrub grout, remove stains or efflorescence, then polish and reseal. Followed properly, your floors will visibly improve — keep going for full step-by-step guidance.
Quick Answer Can Old Floor Tiles Be Cleaned and Restored?
Yes — most old floor tiles can be cleaned and many can be restored to a much better appearance.
Expect results to range from simple brightening with basic cleaners (minutes to hours, low cost) to deeper restoration like grout repair or sealing (days, moderate cost and effort).
Decide how much time and money you’ll invest to match the finish you want.
Short summary of results you can expect
If your tiles are ceramic, porcelain, or natural stone that haven’t been structurally damaged, you can usually clean and greatly restore their appearance with the right products and some elbow grease.
You’ll remove grime, revive color, and often brighten grout. Following clear how to clean old floor tiles steps, you can expect noticeable aesthetic improvement, though deep chips or cracks will still need repair or replacement.
Time, cost, and effort overview
Cleaning and restoring old floor tiles is usually quick to moderate in time, depending on how dirty and damaged they are: expect anywhere from a couple of hours for a single small room to a weekend for whole floors that need deep scrubbing, grout work, and sealing.
You’ll balance time, cost, and effort; plan tools, cleaners, and possible pro help.
- Relief
- Pride
- Renewal
Basic Understanding Why Old Floor Tiles Look Dull or Stained
You’ll usually find that dullness or staining comes from surface grime, grout buildup, wear, efflorescence, or failing sealant trapping dirt.
How easy those issues are to fix depends on the tile material—ceramic and porcelain generally clean up well, while natural stone or vinyl may need gentler or specialized treatments.
Start by identifying the cause and the tile type so you can choose the right cleaning method.
Common causes: grime, grout buildup, wear, efflorescence, sealant failure
When tiles start to look dull or stained, several everyday causes are usually to blame: grime and oil build up on surfaces, grout darkens from dirt and mold, surface wear erodes glaze, efflorescence leaves white mineral deposits from moisture, and sealant failure lets stains penetrate.
You can target each cause differently, so identifying the culprit helps you choose the right cleaning and repair approach.
How tile material affects restoration (ceramic, porcelain, natural stone, vinyl)
Because tiles are made from different materials, the fixes that work on one type can damage another, so you’ll want to match your cleaning and restoration methods to the material. You should test cleaners, use gentle methods for porous stone, stronger degreasers for glazed ceramic, and avoid harsh abrasives on vinyl.
| Material | Best approach |
|---|---|
| Ceramic | Mild detergent, nonabrasive pad |
| Porcelain | Hot water, pH-neutral cleaner |
| Natural stone | Stone-safe cleaner, reseal |
| Vinyl | Gentle cleaner, avoid solvent |
Safety, Tools, and Materials Checklist
Before you start, make sure you’ve got the right personal protective equipment and good ventilation so you don’t inhale dust or fumes.
Gather the essential tools and cleaners that match your tile type—ceramic, natural stone, or vinyl all need different treatments.
If stains, damage, or odor issues look beyond a home fix, call a professional sooner rather than later.
Personal protective equipment and ventilation basics
1 simple rule: protect your lungs, eyes, and skin before you touch old tiles. You’ll need proper PPE and airflow so dust and fumes don’t harm you.
Open windows, run a fan, and wear gear.
- N95 mask — breathe easy
- Safety goggles — shield your eyes
- Chemical-resistant gloves — protect hands
Essential tools and cleaning products for each tile type
Now that you’ve got PPE on and airflow set, gather the right tools and cleaners for the tile material you’re working with so you don’t damage surfaces or waste effort. Match pH-safe cleaners, soft brushes, and suitable sealers to tile type. Use this quick checklist:
| Tile type | Recommended tools/products |
|---|---|
| Ceramic/Porcelain | Mild cleaner, microfiber mop |
| Natural stone | pH-neutral cleaner, soft brush |
| Vinyl | Gentle detergent, nonabrasive pad |
| Terracotta | Specialized sealer, stiff brush |
When to call a professional
If stains won’t budge, grout is crumbling, or you’re unsure about the tile’s material or appropriate sealer, call a professional who can assess hazards, recommend repairs, and finish the job safely.
They’ll also have the right tools, PPE, and testing supplies to avoid costly mistakes.
You should also hire help for large areas, uneven substrates, structural damage, or if you lack time, equipment, or confidence.
Step-by-Step Restoration Process
Start by inspecting your tiles to identify their type and any damage so you know what treatments are safe.
Next, do dry prep—sweep and vacuum to remove loose debris—then spot-test your chosen cleaner in an inconspicuous area.
Finally, follow targeted deep-cleaning methods for your tile type and restore grout by cleaning, whitening, regrouting if needed, and sealing.
Step 1 Inspect and identify tile type and damage
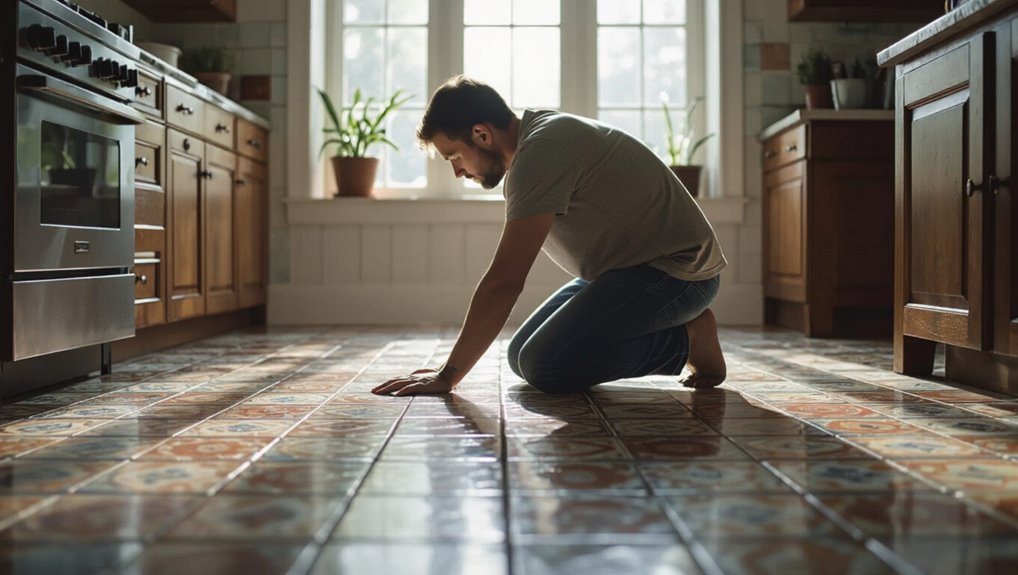
Before you touch a mop, take time to inspect the floor so you know what you’re working with and how delicate the tiles are.
Check tile material—ceramic, porcelain, stone, or vinyl—look for cracks, chips, grout damage, stains, efflorescence, or loose tiles.
Note previous sealers or wax. Photograph areas, mark priorities, and decide whether professional repair or gentle cleaning is needed before proceeding.
Step 2 Dry preparation: sweeping, vacuuming, removing loose debris
Sweep and vacuum thoroughly to remove grit, dust, and loose debris that can scratch tiles or clog grout—work methodically from one side of the room to the other, pulling dirt toward a single exit point.
Then use a soft-bristle broom for corners, a crevice tool on your vacuum for edges, and a dust mop to catch fine particles before any wet cleaning begins.
Step 3 Test patch: choose cleaner and test in an inconspicuous spot
Now that the floor is free of loose grit and dust, pick a cleaner suited to your tile type—pH-neutral cleaners for natural stone, mild detergents for glazed ceramic, and diluted vinegar only for non-porous tiles.
Test in an inconspicuous spot, apply sparingly, wait the recommended time, then blot and inspect for color change, etching, or residue.
Proceed only if no damage appears.
Step 4 Deep cleaning methods by tile type
For ceramic and porcelain tiles, you’ll use degreasers, a baking soda paste for stains, or a steam cleaner to lift grime.
For natural stone, pick stone-safe cleaners and poultices and never use acids that can etch the surface.
For vinyl and laminate, stick to gentle cleaners and microfiber mopping to protect the finish.
Ceramic and porcelain: degreasers, baking soda paste, steam cleaning
When tackling ceramic and porcelain tiles, start with a degreaser to break down surface oils and grime so your subsequent treatments work better.
Apply a pH-neutral degreaser, scrub grout with a stiff brush, then rinse.
For stains, make a baking soda paste, let sit, scrub and rinse.
Finish with steam cleaning to sanitize and lift remaining residue, drying thoroughly to prevent streaks.
Natural stone: stone-safe cleaners, poultices, avoid acids
If your home has natural stone tiles—marble, travertine, limestone, or slate—you’ll need a gentler approach than you used on ceramic or porcelain.
Use pH-neutral, stone-safe cleaners and soft brushes. For stubborn stains, apply a tailored poultice, follow manufacturer directions, and allow full drying.
Never use acidic cleaners (vinegar, citrus) or abrasive pads, which etch and dull stone surfaces.
Vinyl and laminate tiles: gentle cleaners and microfiber mopping
Although vinyl and laminate look tough, they’re sensitive to harsh chemicals and excess water, so you’ll want to use mild, pH-neutral cleaners and a microfiber mop to lift dirt without damaging seams or finishes.
Dilute cleaner per instructions, wring the mop so it’s damp not wet, work in small sections, rinse with clean water if needed, and dry promptly to prevent swelling or streaks.
Step 5 Grout restoration: cleaning, whitening, regrouting, sealing
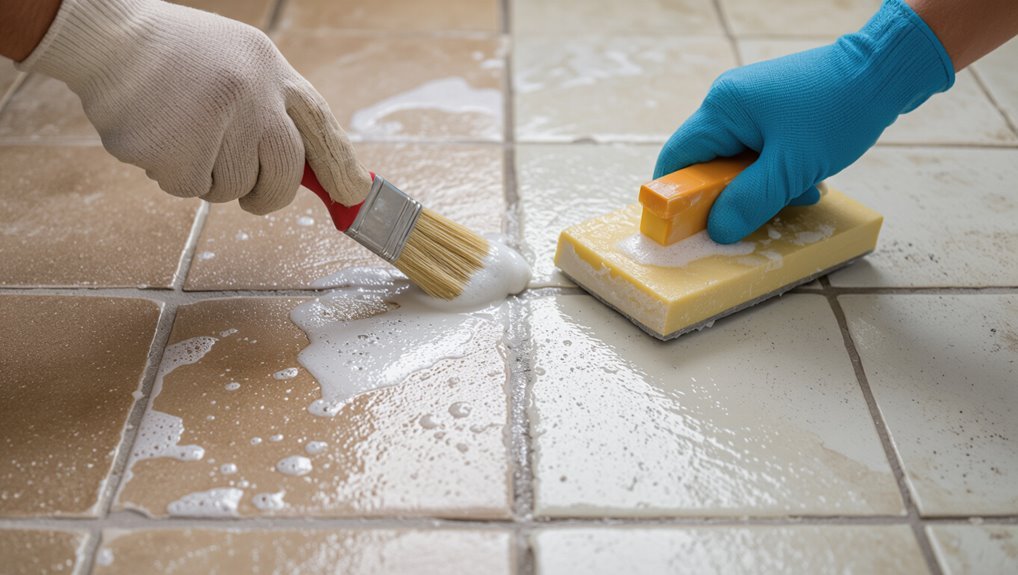
Start by tackling the grout—it’s what makes your tiles look finished or filthy—so you can clean, whiten, regrout, and seal it effectively.
Scrub with a nylon brush and pH-neutral cleaner, apply a whitening poultice or grout brightener, remove damaged grout and pack new grout into joints, then wipe smooth.
Once cured, apply a penetrating sealant to protect and simplify future maintenance.
Step 6 Removing stubborn stains and efflorescence (chemical and mechanical options)
Tackle stubborn stains and efflorescence with a mix of targeted chemistry and careful mechanical action so you don’t damage the tile or grout.
Test a pH-appropriate cleaner on a hidden area, apply poultices or diluted acid for mineral deposits, then scrub gently with nylon brushes.
Rinse thoroughly, neutralize residues, and repeat only where needed.
Use protective gear and ventilate the space.
Step 7 Polishing and buffing techniques for shine restoration
Once you’ve removed stains and neutralized residues, it’s time to bring back the tile’s luster with careful polishing and buffing.
Use a soft pad on a low-speed floor polisher or a microfiber cloth for hand work. Move evenly, overlapping passes and avoiding heat buildup.
For dull grout edges, work gently. Wipe residue, inspect shine, and repeat light passes until uniform gloss appears.
Step 8 Sealing tiles and grout: products, application, drying times
Before you seal, make sure tiles and grout are completely clean and dry so the product bonds properly; choose a penetrating sealer for porous stone or a topical sealer for gloss.
Apply evenly with a brush or roller, following manufacturer coverage. Wipe excess, allow initial set (30–60 minutes) and full cure (24–72 hours).
Test a small area first and ventilate during drying.
Step 9 Final inspection and touch-ups
Inspection time: you’ll walk the whole floor slowly, looking for missed grout lines, spots with uneven sealant, chips, or residues from cleaners.
Mark trouble areas, reapply grout or sealant sparingly, sand tiny bumps, and clean residue with a damp microfiber.
Let touch-ups cure, then do a final wipe and test a small area for durability.
Step back and approve your work.
Alternate Methods and Comparison
Now you’ll compare alternate approaches so you can pick what fits your time, budget, and tile type.
We’ll weigh professional vs DIY restoration, chemical cleaners vs natural remedies, and steam cleaning vs mechanical scrubbing.
For each option, you’ll get the main pros and cons to help you decide.
Professional vs DIY restoration
Whether you tackle tile restoration yourself or hire a pro depends on your budget, time, and the tile’s condition. You’ll save money DIYing small jobs, but pros bring speed, specialized tools, and guaranteed results for severe damage. Choose DIY for light wear and a weekend; hire pros for deep stains, cracked grout, or historic tiles you can’t risk.
| Option | When to choose |
|---|---|
| DIY | Light wear, tight budget |
| Pro | Severe damage, historic tiles |
| Hybrid | DIY prep, pro finish |
Chemical cleaners vs natural/home remedies
After deciding who’ll handle the job, you’ll need to pick cleaning agents: commercial chemical cleaners or natural/home remedies.
You’ll weigh potency, safety, and cost. Chemicals remove stubborn grout stains fast but smell harsh; naturals feel gentler and eco-friendly but may need more elbow grease.
Choose based on tile type, ventilation, and sensitivity.
- Effectiveness
- Safety
- Preference
Steam cleaning vs mechanical scrubbing: pros and cons
While both steam cleaning and mechanical scrubbing can revive old floor tiles, they take different approaches: steam uses high-temperature vapor to loosen dirt and sanitize with minimal chemicals, while mechanical scrubbing relies on brushes or pads to physically abrade grime and restore texture.
You’ll choose steam for gentle sanitizing and tight grout, and mechanical scrubbing for stubborn stains and textured surfaces, balancing speed, damage risk, and drying time.
Common Mistakes and How to Avoid Them
Don’t use acidic cleaners on natural stone, since they can etch the surface and ruin the finish.
Avoid over-scrubbing glazed or sealed tiles and always try a test patch before applying new cleaners or sealants to prevent discoloration.
Make sure you seal properly and follow curing instructions to prevent moisture problems later.
Using acidic cleaners on stone
If you use acidic cleaners on natural stone, you can quickly etch or dull the surface because acids react with the minerals in materials like marble, limestone, and travertine.
Don’t assume vinegar or citrus cleaners are safe. Test cleaners in an inconspicuous spot, use pH-neutral products labeled for stone, rinse thoroughly, and blot spills immediately to prevent lasting damage.
Over-scrubbing and damaging glaze or sealant
Scrub gently—aggressive scrubbing or using stiff brushes and abrasive pads can wear down a tile’s glaze or strip away sealant, leaving the surface dull and vulnerable to stains.
Use soft brushes, microfiber mops, and non-abrasive cleaners. Rinse thoroughly, dry promptly, and reapply sealant when recommended.
Test a small, inconspicuous area first to confirm your method won’t mar the finish.
Skipping test patches and causing discoloration
Because old tiles can react unexpectedly to cleaners or sealers, always try a small test patch before treating the whole floor.
You’ll spot color change, staining, or finish dulling on a hidden edge. Test different products and dwell times, document results, and wait for full drying.
That prevents wide-scale discoloration and saves time, money, and frustration.
Improper sealing and moisture issues
When moisture gets trapped beneath or between old tiles, you’ll soon see grout breakdown, mold growth, and peeling sealers that undo hours of work; to avoid that, choose the right sealer for your tile type, follow manufacturer cure times, and make certain the substrate is fully dry before sealing.
Inspect for leaks, fix ventilation, use breathable sealers where needed, and re-seal regularly to prevent recurrence.
Prevention and Long-Term Maintenance Best Practices
Keep a simple daily and weekly cleaning routine to prevent grime build-up, and schedule a seasonal deep-clean checklist to tackle grout and stubborn stains.
Use rugs, entry mats, felt pads on furniture, and control indoor humidity to protect tiles over time.
Check sealant annually and reseal as recommended to maintain waterproofing and shine.
Daily and weekly cleaning routines
A simple daily wipe and a quick weekly mop will prevent dirt buildup and extend the life of old floor tiles; you’ll save time and avoid costly repairs by staying consistent.
Keep routines short, use gentle cleaners, and act on spills immediately.
- Wipe spills fast — protect grout and shine.
- Sweep daily — feel calm in a tidy home.
- Mop weekly — preserve tile finish and pride.
Seasonal deep-clean checklist
After your daily wipes and weekly mops, schedule seasonal deep-cleans to tackle grime that routine care misses and to prevent long-term damage.
Each season, inspect grout and tiles, degrease with appropriate cleaner, scrub grout lines, rinse thoroughly, and allow full drying.
Reapply sealant where needed, replace cracked grout, and document issues for timely repairs so wear doesn’t worsen.
Protective measures: rugs, felt pads, entry mats, humidity control
One simple step you can take is to place area rugs and entry mats in high-traffic zones to catch dirt and moisture before they reach the tiles.
Use non-slip pads and felt protectors under furniture to prevent scratches. Vacuum or shake rugs regularly.
Control indoor humidity with dehumidifiers or vents to avoid grout deterioration and mold growth, keeping tiles stable and long-lasting.
When to reseal and how often
Keeping rugs, felt pads, and proper humidity in place helps reduce wear, but you’ll still need to know when to reseal tile and grout to maintain protection.
Test grout with water—if it soaks in within minutes, reseal. Generally reseal grout every 1–3 years and porous stone every 1 year.
High-traffic areas may need more frequent sealing; keep records and inspect annually.
Cost, Time, and Effort Estimates
You’ll want a clear DIY cost breakdown for different cleaning methods and materials so you can pick the cheapest effective option.
Expect small rooms to take an hour or two, medium areas a half day, and large spaces a full day or more depending on prep and drying time.
If grout is crumbling, tiles are loose, or staining won’t lift after thorough cleaning, it’s usually time to replace rather than restore.
DIY cost breakdown by method and materials
Budgeting matters when tackling old floor tiles yourself: this section breaks down typical costs, time, and effort for common cleaning methods so you can pick what fits your schedule and wallet. You’ll find budget, midrange, and deep-clean options with estimated materials and effort so you can plan purchases and labor realistically.
| Method | Estimate |
|---|---|
| Basic mop | $10–20 |
| Scrub + cleaner | $20–40 |
| Steam clean | $50–150 |
| Grout repair | $15–60 |
Typical time required for small, medium, and large areas
Now that you’ve seen typical costs by method, it’s helpful to match those choices with realistic time and effort estimates for different project sizes.
You’ll feel less stressed if you plan:
- Small (bathroom/entry): 1–3 hours — quick satisfaction.
- Medium (kitchen/living): 4–8 hours — noticeable progress.
- Large (whole house): 1–3 days — rewarding but tiring.
Signs it’s time to replace rather than restore
Although restoring tiles can save money, there are clear signs that replacement is the smarter choice. If grout is crumbling, tiles are cracked or loose, or moisture has warped the substrate, repairs will only be temporary and costs — time and money — will add up.
You should factor material, disposal, and labor; expect higher upfront cost but lower long-term maintenance and quicker, reliable results.
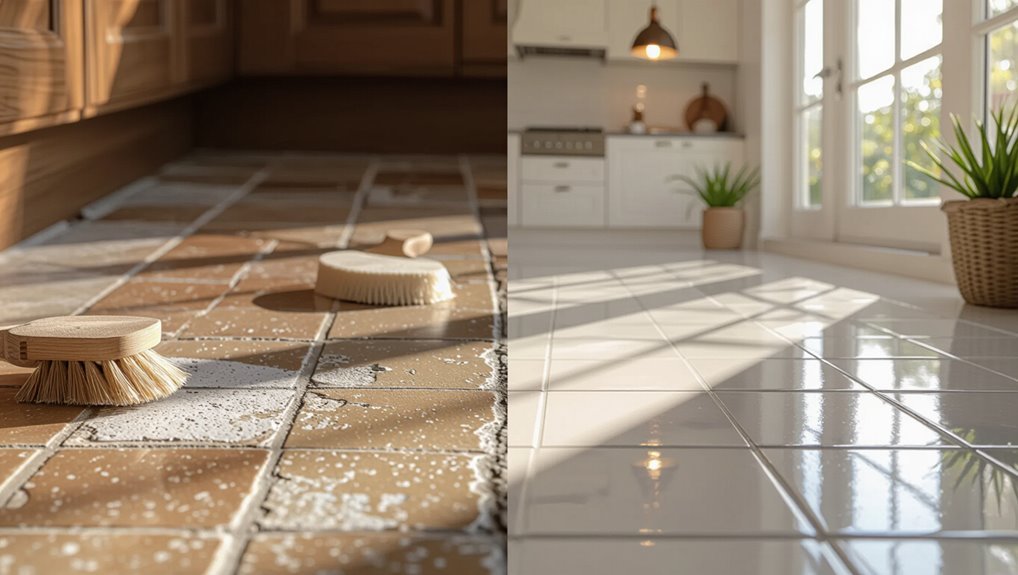
Before-and-After Case Examples
You’ll see real results in three quick case summaries that show what works for different floors.
First, a kitchen ceramic tile restoration that removed grout haze and restored shine without replacing tiles.
Next, a bathroom natural stone rescue that neutralized stains and repaired etching.
Finally, a high-traffic vinyl refresh that lifted scuffs and renewed finish for daily wear.
Kitchen ceramic tile restoration (case summary)
In this section we’ll walk through several kitchen ceramic tile restorations, showing clear before-and-after examples that highlight the cleaning methods, grout repair, and finishing steps used to bring aged tiles back to life.
You’ll see practical sequences: degrease, deep-clean, spot-sand glazed damage, regrout and seal.
Each case notes time, products, and visible results so you can replicate reliable, safe outcomes in your kitchen.
Bathroom natural stone rescue (case summary)

After restoring kitchen ceramics, you’ll find natural stone in bathrooms asks for a different approach: softer cleaners, careful stain lifting, and gentle honing rather than aggressive scrubbing.
You’ll evaluate porous marble or travertine, test pH-neutral products, poultice localized stains, and use microfiber rinses.
Sealing follows once dry.
The result: muted limescale and restored color without etching or dulling the stone.
High-traffic vinyl floor refresh (case summary)
Tackle worn, scuffed vinyl by starting with a clear assessment of traffic patterns and finish type so you know whether cleaning, buffing, or a light recoat will do the job; in high-traffic areas I test for surface wear, deep ingrained dirt, and any lifting seams before choosing a low-alkaline cleaner, rotary scrubbing with a soft pad, or a polymer restorative finish.
You’ll then rinse, dry, repair seams, and apply a thin restorative coat to restore sheen and durability, minimizing downtime and recurring maintenance.
Frequently Asked Questions
You probably have a few quick questions about cleaning and caring for old tiles and grout, like whether bleach is safe or how to remove mold without damaging surfaces.
You’ll also want to know if sealing will change the look, how often to reseal or replace grout, and whether cracked or chipped tiles can be restored.
Keep reading for clear, practical answers to each of these concerns.
Can I use bleach to clean old tiles and grout?
Wondering if bleach’ll revive old tiles and grout? You can use diluted bleach for disinfecting and light stain removal on glazed tiles and sound grout, but avoid prolonged soaking.
Test a hidden area first, ventilate well, and never mix bleach with ammonia or acids.
For porous tiles, colored grout, or vintage finishes, choose milder cleaners or consult a pro to prevent damage.
How do I remove mold or mildew from floor tiles safely?
If bleach helped with stains but you’re still spotting dark patches, those are likely mold or mildew that need a different approach.
Ventilate the area, wear gloves and a mask.
Mix equal parts white vinegar and water or use a commercial mold cleaner.
Scrub grout with a brush, rinse thoroughly, and dry completely.
Repeat if needed and fix moisture sources to prevent return.
Will sealing change the appearance of my tiles?
How will sealing affect your tile’s look?
Sealing can deepen colors and add a subtle sheen, making tiles appear richer and more vibrant without altering their pattern.
Matte sealers keep a natural finish; glossy sealers boost shine.
Test a small area first so you’re happy with the effect.
Sealers won’t change tile texture but can slightly darken grout tones.
How often should grout be replaced or sealed?
When should you reseal or replace grout depends on traffic, moisture exposure, and the grout’s condition—seal grout every 1–2 years in wet areas and consider replacing it when cracks, crumbling, or persistent stains resist cleaning.
Inspect grout annually, scrub and test sealant adhesion, and reseal sooner in showers or high-traffic rooms.
Replace grout if structural gaps appear, mold returns after thorough cleaning, or tiles shift.
Can I restore heavily cracked or chipped tiles, or do they need replacement?
Noticing cracked or chipped grout often leads homeowners to check the tiles themselves, since damaged grout can expose edges and make tiles more vulnerable.
You can repair minor chips with epoxy fillers and match paint or use tile repair kits for hairline cracks.
But heavily cracked or crumbling tiles usually need replacement—especially if they’re loose, structurally compromised, or allowing moisture under the floor.