How to Keep Floor Tiles Clean and Shiny Easily
Keep tiles clean and shiny by sweeping or vacuuming grit weekly, mopping with a mild pH-neutral cleaner diluted per label, and rinsing thoroughly to remove residue. Spot-treat grout with a baking-soda paste and a soft brush for stubborn marks, then dry with a microfiber cloth to avoid streaks. Identify your tile type and seal porous stone to prevent stains, avoid harsh scrubbing on sensitive edges, and follow manufacturer care—keep going to pick up practical tools, tips, and troubleshooting.
Quick Weekly Tile Cleaning Routine (Do This Now)
If you want your tiles to stay bright with minimal effort, follow a quick weekly routine that takes 15–20 minutes.
You’ll sweep or vacuum to remove grit, then mop with a mild pH-neutral cleaner diluted per label.
Spot-treat grout with a soft brush and a baking soda paste for stubborn marks.
Rinse with clean water to avoid residue, and dry with microfiber to prevent streaks.
Check grout lines for damage and note any discoloration—these cues help when choosing color options for future repairs and match grout after minor fixes.
Keep installation tips in mind to avoid scrubbing sensitive edges.
Which Tile Type Do You Have: Ceramic, Porcelain, or Stone?
Before you start cleaning, figure out what your tiles are made of—ceramic, porcelain, or natural stone—since each needs different care.
Check porosity by placing a few drops of water on an inconspicuous spot; if it soaks in quickly, you’ve got porous stone that needs sealing.
Also look for a glossy glaze or a factory seal to know whether you can use stronger cleaners or should stick to pH-neutral products.
Identify Tile Material
Wondering which tile you’re standing on? Look closely: ceramic often has printed tile patterns and a glazed surface, while porcelain feels denser and usually has more consistent color through the body.
Natural stone—marble, slate, travertine—shows irregular veining and texture.
Tap tiles: ceramic sounds slightly hollow; porcelain sounds solid.
Check grout colors and joint widths: thinner, uniform joints often pair with porcelain; wider, varied grout suits natural stone or handmade ceramics.
If still unsure, scratch a hidden edge gently; ceramic scratches more easily than porcelain.
When you identify material, you’ll choose cleaners and care that match its needs.
Check Tile Porosity
How porous are your tiles, and why does it matter? You’ll check porosity because tile absorption affects cleaning, staining, and product choice.
Do a simple porosity testing spot: drop water, watch absorption time, and note results. Use this quick guide:
- Water beads and sits — low absorption; likely porcelain, cleans easily.
- Water slightly soaks in within minutes — moderate absorption; probably glazed ceramic.
- Water disappears quickly or darkens stone — high absorption; natural stone needs careful care.
Record results so you choose cleaners that match absorption. Porosity testing keeps you from using wrong products that harm tiles.
Spot Glaze Or Seal
Once you’ve checked porosity, decide whether your tiles need a spot glaze or a seal. If you have glazed ceramic or porcelain, a spot glaze can refresh worn areas and restore shine without changing color.
Unglazed porcelain resists stains; you usually won’t seal it. Natural stone absorbs moisture and benefits from a penetrating seal that offers color enhancement and protects against spills.
Apply sealant following manufacturer directions, and test a small area first.
Don’t forget grout sealing—clean grout, then use an appropriate sealer to prevent staining and simplify maintenance. Reapply sealers periodically for lasting protection.
Why Proper Tile Care Protects Floors and Restores Shine
If you stick to simple preventative maintenance habits like sweeping and using mats, you’ll cut down on scratches and wear.
Use the right cleaning techniques and products for your tile type to remove dirt without harming the finish.
Restoring grout and polishing or resealing tiles brings back the shine and extends the life of your floor.
Preventative Maintenance Habits
Because you care for tiles regularly, you’ll prevent grime buildup and keep their finish looking like new. You protect tile design and maintain grout color by adopting simple habits that stop damage before it starts. Sweep daily, address spills immediately, and use entry mats to limit grit.
Schedule light inspections to spot wear, sealing grout as needed to preserve contrast and prevent stains. Rotate furniture pads to avoid scratches. Small, consistent steps save time and keep shine.
Follow this short checklist:
- Daily sweeping and spot wiping
- Weekly inspection and grout touch-up
- Use mats and furniture pads
Proper Cleaning Techniques
When you clean tiles the right way, you protect their finish and bring back their shine without scrubbing endlessly. Use a soft broom or vacuum first to remove grit that scratches surface and dulls tile artistry.
Choose a pH-neutral cleaner for regular mopping; harsh acids or alkalis can dull glazes and harm decorative patterns.
Work in small sections, rinse with clean water, and dry with a microfiber cloth to avoid streaks and water spots.
For spot cleaning, let a gentle solution sit briefly, then blot rather than scrub.
Consistent, careful technique preserves beauty and extends tile life.
Restore Grout And Shine
Although it often goes overlooked, restoring grout is one of the quickest ways to make your tiles look brand new again; you’ll protect surfaces and boost shine by tackling grout staining and finishing with tile polishing.
Start by scrubbing grout lines, then apply a stain-resistant sealant to prevent future discoloration. Follow with gentle tile polishing to revive luster without damaging finish.
Keep to a simple routine:
- Deep-clean grout with a brush and pH-neutral cleaner.
- Apply grout sealer once dry to stop grout staining.
- Polish tiles lightly for a lasting sheen.
You’ll extend tile life and keep floors gleaming.
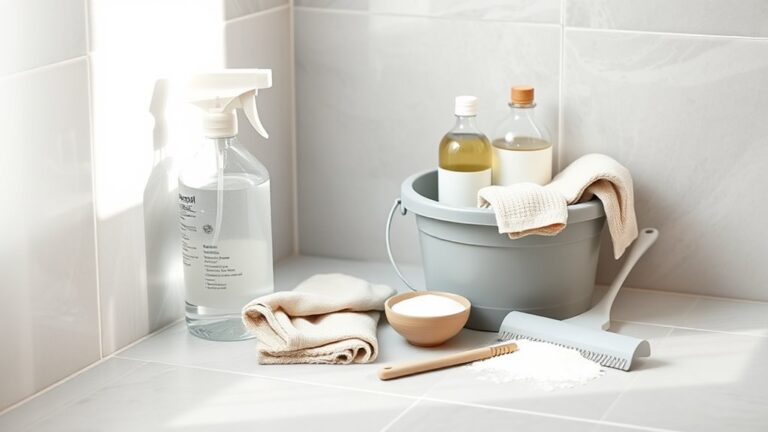
What Tools You Need for Everyday Tile Cleaning

Before you start scrubbing, gather a few simple tools that make regular tile cleaning quick and effective. You’ll want a soft-bristle broom or dust mop to remove grit without dulling tile decor, and a small handheld brush to target grout color lines and corners.
Add a bucket for diluted cleaner, a spray bottle for spot treatments, and rubber gloves to protect your hands. Keep a grout brush or old toothbrush for tight spots, a squeegee for wet areas, and absorbent microfiber towels for drying and buffing.
Store supplies nearby so routine upkeep stays fast and consistent.
Best Mops and Microfiber Cloths for Streak‑Free Tile Floors
If you want streak-free tile with less effort, pick mops and microfiber cloths designed to lift dirt and hold moisture without leaving residue. You’ll want a flat mop with a washable microfiber pad for quick drying and color enhancement on glossy tiles, plus a sponge mop for grout touchups; both aid stain prevention by removing soils fast.
Choose lint-free cloths for buffing and a dual-sided mop for versatility. Maintain pads clean and replace when worn to avoid streaks.
- Flat microfiber mop — fast, even coverage
- Sponge mop — targeted grime removal
- Lint-free buffing cloth — final shine
How to Sweep and Vacuum Without Scratching Tiles
When you sweep or vacuum, go slow and use the right tools so grit doesn’t scratch the tile surface. Use a soft-bristle broom or vacuum with a hard-floor setting and non-marking wheels. Move debris toward a dustpan, avoiding fast strokes that fling particles. Check attachments for stuck grit, and clean them often. Color coordination and Pattern matching can guide where you focus—darker or patterned zones often hide more dirt. Empty the vacuum bin frequently to keep suction strong.
| Tool | Use |
|---|---|
| Soft broom | Gentle sweep |
| Hard-floor vacuum | Safe suction |
| Micro brush | Corners |
| Dustpan | Collect debris |
| Wheel check | Prevent marks |
Daily Spot‑Cleaning for High‑Traffic Tile Areas

For high-traffic tile areas, do a quick daily sweep to remove grit and crumbs before they abrade the surface.
When you spot spills or sticky patches, grab a damp microfiber mop or cloth and a mild cleaner—treat only the affected area to save time and water.
Repeat small spot-mops throughout the day to keep tiles looking shiny without a full wet mop.
Quick Daily Sweeps
A two‑minute sweep each day keeps dirt and grit from scratching tiles and piling up in grout lines. You’ll protect tile patterns and extend grout maintenance intervals by removing debris before it grinds in. Focus on high-traffic zones: entryways, kitchens, and hallways.
- Sweep toward a dustpan in short, overlapping strokes.
- Use a soft-bristle broom or microfiber sweeper to capture fine particles.
- Empty the sweeper often and check corners for trapped grit.
Do this right after peak activity times. Consistent quick sweeps save time, prevent dulling, and make deeper cleans less frequent.
Spot Mop Guidelines
Because high-traffic areas show spills and scuff marks fast, spot mopping daily keeps your tiles looking fresh without a full wet clean. You’ll respond quickly: blot liquids, sweep loose debris, then damp-mop the affected spot with a microfiber pad and mild pH-neutral cleaner.
Work along tile patterns to avoid streaks and protect grout colors by rinsing the pad frequently. For scuffs, try a rubber eraser or gentle scrubbing brush.
Change water when it gets dirty and dry the area to prevent residue. Do small sections at a time so you’re efficient and your floor stays consistent.
How to Choose a Safe Cleaner for Your Tile Type
When you pick a cleaner, match it to your tile material and grout—different tiles react differently to acids, alkalis, and abrasives—so check labels and test in an inconspicuous spot first.
You’ll want to favor eco friendly cleaning solutions when possible and avoid harsh acids on natural stone. Consider these points before buying or mixing any product:
- Porous stone (marble, travertine): use pH-neutral cleaners only.
- Glazed ceramic/porcelain: mild detergents or diluted vinegar alternatives are fine.
- Grout and sealant: choose cleaners compatible with sealers; avoid repeated abrasive scrubbing.
Don’t confuse safe choices with homemade recipes here—see separate section.
Homemade All‑Purpose Tile Cleaner Recipes That Actually Work
If you prefer control over ingredients and cost, homemade tile cleaners can be simple, effective, and safe when matched to your tile type.
Below are easy recipes that actually work without harsh chemicals.
For ceramic or porcelain: mix 1/2 cup white vinegar, 1 gallon warm water, and a few drops of dish soap.
For stone (avoid vinegar): combine 1/4 cup mild pH-neutral soap with 1 gallon warm water.
For stubborn dirt, add 1/4 cup baking soda to the soap solution as a paste for spot cleaning.
Test first in an inconspicuous area, considering tile patterns and grout colors before full use.
Natural Solutions for Streak‑Free Tile Shine
You can get a streak‑free shine with simple pantry staples that are gentle and effective. Try a vinegar-and-water mop for everyday cleaning, a lemon-based spray for quick spot removal, and a baking soda paste to scrub away stubborn grime.
Mix and test each on a small area so you know what works best for your tile finish.
Vinegar And Water Mix
Although it sounds simple, a vinegar-and-water mix is one of the quickest, cheapest ways to get streak-free tile shine. You’ll mix equal parts white vinegar and warm water, use a microfiber mop, and avoid overly wetting grout to protect grout colors and highlight tile patterns.
Apply, mop, then dry with a clean cloth for instant gloss. Follow these steps:
- Sweep, then spray the diluted solution sparingly.
- Mop along grout lines, rinsing the mop frequently.
- Buff dry to remove residue and prevent streaks.
Test first on an inconspicuous area; don’t use on natural stone.
Lemon-Based Spot Cleaner
Vinegar works great for broad cleaning, but for quick spot treatments and fresh scent, try a lemon-based cleaner. You’ll squeeze lemon juice, mix with water, and dab on Lemon spots or mild Citrus stains. Let it sit a minute, then wipe; the acid lifts residues and brightens grout without harsh chemicals. Test a hidden area first. Use a soft cloth and rinse well to avoid stickiness. For stubborn marks, repeat once. Store leftover mix briefly in a sealed jar and use within a day.
| Use | Tip |
|---|---|
| Fresh juice | Best for potency |
| Dilution | 1:2 water |
| Test area | Prevent damage |
| Cloth type | Microfiber recommended |
| Rinse | Remove residue |
Baking Soda Scrub
When you need a gentle, effective scrub that won’t leave streaks, baking soda’s mild abrasiveness lifts dirt and grime without scratching most tile surfaces. You’ll mix baking soda with water to a paste, apply to stained areas, and scrub with a soft brush.
Work gently on grout coloring to avoid fading dyed grout. Test hidden spots first, especially on delicate Tile art finishes. Rinse thoroughly and buff dry for shine.
Follow these steps:
- Apply paste, wait 5–10 minutes.
- Scrub with a soft brush along grout lines.
- Rinse well and dry immediately.
Vinegar and Tiles: When It Helps and When to Avoid It
If you’re cleaning glazed ceramic or porcelain tiles, diluted white vinegar can cut grease and leave a streak-free shine without harsh chemicals. You should test a small area first: vinegar risks include etching on natural stone, damaging grout sealer, or dulling some finishes.
Use a mild 1:10 vinegar-to-water mix for routine mop jobs and rinse with clean water to remove residue.
Use a mild 1:10 vinegar-to-water mix for routine mopping, then rinse with clean water to remove residue.
For stone, unglazed, or waxed surfaces, skip vinegar and choose alternative cleaners like pH-neutral tile solutions, enzyme-based products, or gentle dish soap.
Always follow manufacturer care instructions and ventilate while cleaning.
How to Use Baking Soda for Gentle Tile Scrubbing
You can make a simple baking soda paste by mixing it with water until it’s spreadable, then apply it to stained or grimy tile areas.
Use a soft brush or microfiber cloth to gently scrub in circular motions so you don’t scratch the tile or grout.
Rinse thoroughly and dry to reveal a brighter, residue-free surface.
Baking Soda Paste Technique
Although it’s mild, baking soda packs enough gentle abrasiveness to lift grime without scratching most glazed floor tiles. So, mix a paste with water, apply it to stained areas, let it sit briefly, then scrub with a soft brush or cloth.
You’ll treat spots on tile mosaics or worn surfaces without harming the finish. Follow with a damp rinse and dry to prevent residue.
After cleaning, consider grout sealing to protect joints.
Quick steps:
- Combine 3 parts baking soda to 1 part water to form a spreadable paste.
- Work the paste into stains, wait 5–10 minutes.
- Rinse thoroughly and buff dry.
Safe Scrubbing Tips
After rinsing away the baking soda paste, it’s time to scrub gently so you lift residue without marring the tile or grout. Use a soft-bristle brush or microfiber pad, apply light pressure, and work in small sections. Rinse frequently to avoid abrasive buildup.
For stubborn spots, reapply a thin paste and let it sit briefly before scrubbing. Dry the area thoroughly to prevent mold prevention issues and maintain a dry environment.
Once clean, consider grout sealing to protect joints and reduce dirt buildup. Regular gentle scrubbing keeps tiles bright without damaging surfaces or grout lines.
Making a Neutral‑pH Cleaner for Natural Stone Tiles
Because natural stone reacts to acids and harsh alkalis, you’ll want a neutral-pH cleaner that cleans without etching or dulling the surface. Mix warm distilled water with a gentle, pH-balanced stone soap or castile soap (use very little) and add a few drops of a mild, citrus-free essential oil if desired. Test in an inconspicuous spot first. Store in a labeled spray bottle and shake before use. Follow these simple steps:
- Combine 1 gallon water with 1–2 tablespoons stone soap.
- Stir gently; avoid suds.
- Spot-test for 24 hours before full use.
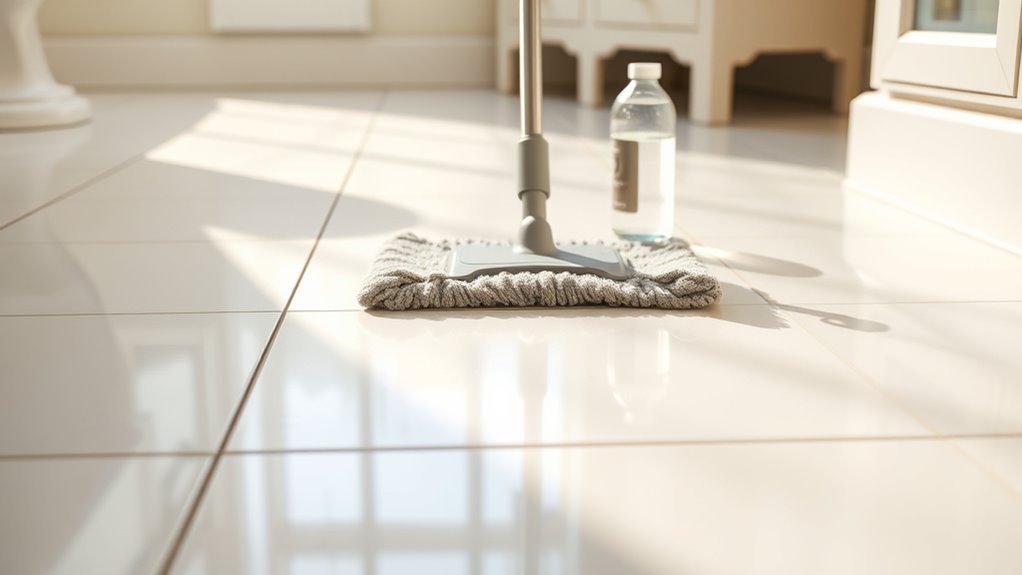
How to Mop Tile Floors for a Glossy Finish
Pick a mop that matches your tile—microfiber for smooth tiles, a flat microfiber or sponge mop for textured surfaces—to avoid streaks and trapped dirt.
Rinse the mop frequently and finish with a glossy rinse solution or plain distilled water to remove residue and boost shine.
Work in small sections and let each area air-dry for a mirror-like finish.
Choose The Right Mop
Which mop you choose makes a bigger difference than you might think when aiming for glossy tile floors. You want a tool that lifts dirt, avoids streaks, and complements your tile’s color contrast and pattern matching so residue doesn’t hide in grout lines.
Pick based on tile type and finish.
- Microfiber flat mop — good for smooth tiles, squeezes out easily, leaves fewer streaks.
- Sponge mop — absorbs spills fast, better for textured surfaces but needs frequent rinsing.
- Steam mop — sanitizes without chemicals, ideal for sealed tiles but avoid unsealed porous stone.
Use A Glossy Rinse
When you want a true shine, finish mopping with a glossy rinse that removes residue and smooths the surface for light to reflect evenly.
After cleaning, mix the recommended amount of glossy rinse or diluted tile polish in warm water. Mop in straight lines, avoiding over-wetting grout. Change rinse water when it looks dull.
For stubborn streaks, apply a little tile polish directly and buff with a microfiber pad. Let the floor air-dry or dry with a clean, soft cloth to prevent water spots.
Repeat every few weeks to maintain a reflective, protected surface without buildup.
How Much Water to Use When Mopping Tiles
Although you don’t need a puddle, you also shouldn’t skimp on water — the goal is enough moisture to loosen dirt without leaving a soggy floor. Measure by feel: your mop should be damp, not dripping, so you can glide without spreading grime.
Consider how color contrast and tile patterns hide or show residue; darker grout needs slightly more rinsing. Use this simple guide:
- Small rooms: half a bucket (1–2 liters) for a quick damp mop.
- Medium rooms: one bucket (3–4 liters) for consistent coverage.
- Large areas: two buckets, swapping when water looks cloudy.
Quick‑Dry Tips to Prevent Water Spots on Tiles
Right after mopping, you’ll want to wipe up excess water with a clean towel to keep spots from forming.
Run a squeegee across wet tiles to push moisture toward a drain or the room’s edge.
Finish with a microfiber cloth for a streak-free, quick-dry pass.
Wipe Immediately After Mopping
If you want streak-free, glossy tiles, wipe them immediately after mopping to remove leftover moisture before it leaves water spots. You’ll protect tile coloring and prevent grout discoloration by acting while the floor’s damp.
Use a soft microfiber or cotton mop and follow these quick steps:
- Work in small sections so water doesn’t sit.
- Apply light pressure and dry along grout lines to lift trapped moisture.
- Finish with a clean, dry towel to buff any haze.
Do this every time you mop and you’ll maintain shine, avoid rings, and extend the life of your floors.
Use A Squeegee
For an even faster way to remove leftover moisture and prevent water spots, reach for a rubber squeegee after you mop.
Use short, overlapping strokes away from grout lines to push water toward drains or the room edge. Tilt the blade slightly to pick up films and avoid streaks. Rinse the squeegee blade between passes to prevent redepositing dirt.
Practice basic squeegee techniques you’d use in window cleaning—steady pressure, consistent angle—and you’ll get smooth, streak-free tiles.
Store the squeegee upright to dry and inspect the blade for nicks that can mar tile surfaces.
Microfiber For Final Pass
Want spotless, streak-free tiles every time? Use microfiber for the final pass to prevent water spots and boost Microfiber efficiency. After mopping or squeegeeing, finish wet areas quickly so minerals don’t dry on the surface. Focus on Final pass techniques that lift moisture without streaking.
- Wring the cloth damp, not dripping, to avoid puddles.
- Work in small sections, following grout lines for consistent drying.
- Flip to a dry side frequently to keep absorbency high.
You’ll save time and keep shine longer by drying thoroughly with the right microfiber routine.
Removing Soap Scum and Residue From Tile Floors
When soap scum builds up on tile floors, it dulls the shine and makes grout look dingy, so you’ll want to tackle it promptly with the right cleaners and tools.
Use eco friendly solutions like diluted white vinegar or baking soda paste for gentle abrasion; test a small area first.
Apply, scrub grout lines with a nylon brush, then rinse thoroughly to remove residue.
For sensitive pets, choose pet safe products labeled non-toxic and fragrance-free.
Dry with a microfiber mop to prevent streaks.
Repeat weekly or as needed to prevent buildup and keep tiles glossy without harsh chemicals.
Dealing With Hard‑Water Buildup on Tile Floors
You’ll spot hard-water buildup as chalky, whitish mineral deposits on tile and grout, especially near sinks and entryways.
You can loosen those deposits by applying white vinegar, letting it sit for a few minutes, then scrubbing with a brush.
Rinse thoroughly and dry to prevent the minerals from returning.
Identify Mineral Deposits
Hard-water mineral deposits show up as chalky white or cloudy streaks on tile and grout, and you’ll usually notice them near sinks, showers, or entryways where water pools or splashes. You should inspect surfaces regularly to spot mineral buildup and salt stains before they set.
Look for differences in texture and color, then test small areas by wiping with a damp cloth. Note these signs:
- Powdery white residue that resists simple mopping.
- Dull, chalky patches on glossy tiles.
- Crusty edges along grout lines or fixtures.
Document locations so you can target treatment effectively.
Remove With Vinegar
If mineral streaks and cloudy patches are showing up on your tile, vinegar offers a simple, effective way to dissolve that buildup without harsh chemicals. Mix equal parts white vinegar and warm water in a spray bottle, test a hidden corner, then spray and let sit two to five minutes.
Scrub with a soft brush or microfiber mop, rinse thoroughly with clean water, and dry to prevent new deposits. Keep vinegar away from grout sealed with natural stone, and avoid splashes on indoor plants.
Store leftover solution securely where garden pests or children can’t reach it.
How to Remove Greasy Stains Without Harsh Chemicals
When grease leaves a dull, slippery film on your floor tiles, you can lift it effectively without harsh chemicals by using simple household items and the right technique.
Blot fresh greasy stains with paper towels.
Sprinkle baking soda to absorb oil, then sweep.
Mix warm water with a few drops of dish soap for targeted scrubbing—dish soap cuts grease without harsh solvents.
Rinse with clean water and dry to prevent residue.
For stubborn spots, try a paste of baking soda and water, let sit 10 minutes, then scrub.
Follow up with chemical free cleaning to protect grout and finish.
- Blot
- Absorb
- Scrub
Best Way to Lift Wine, Coffee, and Food Stains on Tiles
Grease-free tiles give you a head start, but sticky spills like wine, coffee, and food need a different approach.
Blot fresh spills immediately with a clean cloth; don’t rub.
Mix a tablespoon of mild dish soap with warm water for ordinary stains, apply, let sit a minute, then wipe.
For wine removal, sprinkle baking soda or use a hydrogen peroxide spot (test grout first) and blot until gone.
For dried food or coffee, soften with warm soapy water, scrape gently, then mop.
Finish by rinsing with clean water and drying.
Regular quick cleanup boosts stain prevention and keeps tiles bright.
How to Remove Ink, Marker, and Paint Spills From Tiles
Because ink, marker, and paint can soak into grout and tile pores fast, act quickly and choose the right solvent for the material you’re removing. Blot fresh ink or marker with a dry cloth, then dab isopropyl alcohol for ink removal; test in an inconspicuous spot.
For water-based paint, scrape gently and wash with warm soapy water.
For stubborn oil-based paint, use a recommended solvent and ventilate.
- Test solvent on hidden tile.
- Work from edges inward to avoid spread.
- Rinse thoroughly and dry to aid stain prevention.
Wear gloves and avoid abrasive scrubbing that can damage tiles.
Removing Adhesive and Gum From Tile Surfaces Safely
When adhesive or gum sticks to your tile, pick a safe solvent like rubbing alcohol, citrus-based remover, or a commercial adhesive cleaner labeled for your tile type.
Test your choice on an inconspicuous spot, then use gentle tools—plastic scraper, soft cloth, or a toothbrush—to lift residue without scratching.
Finish by wiping the area with warm, soapy water to remove solvent traces and restore shine.
Safe Solvent Choices
If you need to remove adhesive or gum from tile, pick a solvent that dissolves the residue without harming the grout or finish. You’ll want options that match your tile’s material and consider how Color coordination or Design trends might influence replacement choices if damage occurs. Test solvents in an inconspicuous spot first.
Options include:
- Isopropyl alcohol (rubs off sticky residues gently).
- Citrus-based solvent (natural, effective on adhesives).
- Commercial adhesive remover rated for your tile type.
Wear gloves, ventilate the area, and avoid bleach or harsh acids that can etch glaze or discolor grout.
Gentle Removal Techniques
Though adhesive and gum can seem stubborn, you can remove them without damaging tile by working patiently and using gentle tools and solvents suited to your surface. Soften residues with warm soapy water or ice for gum, then lift gently with a plastic scraper. Use gentle scrubbing and soft cloths to wipe away residue; avoid metal blades. Test solvents on an inconspicuous spot first. Rinse and dry to prevent streaks.
| Residue Type | Prep | Tool |
|---|---|---|
| Gum | Ice | Plastic scraper |
| Sticker adhesive | Soak | Soft cloth |
| Paint droplet | Solvent test | Gentle scrubber |
How to Clean Grout Lines Without Damaging Tile
Because grout is porous and collects dirt, cleaning it takes a gentler approach than scrubbing the surrounding tile—you’ll want methods that lift stains without etching or discoloring the surface. Avoid vinegar hazards on natural stone or sealed grout; acidic cleaners can dull tile.
Test cleaners on a hidden spot, then follow gentle scrubbing with a soft brush and plenty of water. Consider sealing techniques after cleaning to protect grout and reduce future buildup.
Quick steps:
- Vacuum or sweep debris, mop with pH-neutral cleaner.
- Spot-clean grout with a baking soda paste and soft brush.
- Rinse thoroughly and let dry before sealing.
Grout Brightening: DIY Methods and Store‑Bought Options
When you want grout to look like new again, you can choose simple DIY mixes or ready-made brighteners that save time and effort.
You can scrub stubborn stains with a paste of baking soda and hydrogen peroxide, let it fizz, then rinse.
For gentle cleaning, try vinegar diluted with water on ceramic grout, but avoid acidic mixes on stone.
After brightening, consider grout sealing to protect results.
If you prefer convenience, shop for store-bought options like oxygen bleach powders or commercial grout cleaners—follow label instructions, ventilate the area, test a hidden spot, and use a stiff brush for best results.
When and How to Re‑Seal Grout for Protection
If your grout absorbs water, stains easily, or you just finished a deep clean, it’s time to re-seal to keep dirt and moisture out. You’ll protect grout color and extend life by following a simple routine. Test a small area, choose a penetrating sealer suited to your grout, and note sealing frequency on a calendar. Apply with a brush or applicator, wipe excess, and let cure.
- Clean thoroughly first.
- Seal dry grout in thin coats.
- Re-check annually or sooner in high-traffic areas.
Keep records to match sealer type and sealing frequency.
How to Restore Shine to Dull Porcelain and Ceramic Tiles
Wondering why porcelain or ceramic tiles that once gleamed now look dull? You probably have surface film from cleaners, hard-water buildup, or trapped soil in grout lines.
Start with a gentle, pH-neutral cleaner and microfiber mop to remove residue without harming glaze. For stubborn spots, use a diluted vinegar solution on ceramic (avoid prolonged use) or a commercial tile cleaner recommended for porcelain.
Rinse thoroughly and dry with a clean cloth to prevent streaks.
Refresh the look by cleaning grout and considering grout sealing to prevent future discoloration.
Arrange rugs to protect high-traffic tile patterns and maintain shine.
Polishing Natural Stone Tiles: Safe Dos and Don’ts
Shifting from ceramic and porcelain, natural stone like marble, travertine, and slate needs different care because their surfaces and porosity vary. You’ll protect finishes with correct natural polishing methods and timely stone sealing rather than harsh abrasives.
Natural stone—marble, travertine, slate—requires gentle polishing and regular sealing, not harsh abrasives, to protect finishes.
Follow safe dos and don’ts:
- Do test a small area, use pH-neutral polish, and buff gently with a soft pad.
- Don’t use acidic cleaners, vinegar, or abrasive powders that etch or dull the stone.
- Do reseal periodically per manufacturer guidance and clean spills quickly to prevent staining.
If unsure, consult a pro for guidance before attempting aggressive restoration.
Commercial Tile Polishers: Pros, Cons, and When to Use Them
When you need fast, high-gloss results over large areas, commercial tile polishers can save time and deliver a uniform finish by combining powerful motors with specialized pads and polishing compounds. You’ll get consistent shine on ceramic or porcelain, but test first—some natural stone or delicate Tile design details may dull. Grout color can be affected by abrasive pads or chemicals, so protect edges and rinse thoroughly. Pros: speed, uniformity. Cons: cost, potential surface damage if misused. Use them for big, durable floors; avoid small, intricate, or sensitive surfaces.
| Pros | Cons |
|---|---|
| Speed | Cost |
| Uniform finish | Risk to grout color |
How to Prevent Salt Stains and Winter Grit Damage on Tiles
Polishers work great for big indoor jobs, but winter brings a different challenge: salt and grit dragged in from outside can quickly erode shine and etch tile surfaces. You’ll want to act fast and regularly to protect finishes and prevent salt stains or abrasion from winter grit.
Follow these focused steps:
- Sweep daily to remove grit, then mop with a neutral cleaner to dissolve salt residues.
- Rinse thoroughly and dry to avoid streaks or crystallized salt stains that dull glaze.
- Reapply a tile-safe sealer seasonally on porous tiles to add a protective barrier against salt and grit.
Where to Place Protective Mats and Rugs for Tile Floors
Start by placing durable mats at entryways and doorways to catch dirt and moisture before it reaches your tiles.
Put rugs in high-traffic zones like hallways and in front of sinks to reduce wear and make cleaning easier.
Don’t forget small pads under furniture legs to prevent scratches and keep tiles looking smooth.
Entryway And Doorways
Because most dirt and grit get tracked in through doorways, placing mats and rugs at entry points cuts wear and keeps tiles cleaner longer. You’ll want durable, non-slip mats that trap debris and fit the door frame. Use decorative accents and color coordination to blend function with style so the entry feels inviting.
- Place an outdoor scraper mat first to remove grit.
- Add an indoor absorbent rug to catch moisture and fine dirt.
- Choose sizes that don’t block doors and allow easy cleaning.
Rotate and shake rugs weekly to maintain shine and prolong tile life.
High-Traffic Zones
When people constantly pass through certain areas, your tile wears faster and shows dirt sooner. To address this, place durable, low-profile mats and rugs where foot traffic is heaviest—think hallways, kitchen work zones, in front of sinks and stove, and near doorways to garages or patios.
Choose materials that resist moisture and abrasion to preserve tile durability. Secure rugs with non-slip backing to prevent trips.
Use decorative patterns sparingly to define zones and hide wear without overwhelming the room. Clean mats regularly and rotate them to extend their life.
Replace faded or compressed mats before they cease protecting the tile beneath.
Under Furniture Legs
If you want to prevent scratches, chips, and grout wear where furniture sits, place protective pads or small rugs directly under each leg and move them slightly when you vacuum or mop.
For effective furniture protection, use felt pads, rubber leg bumpers, or washable carpet squares under legs.
Check pads monthly for grit buildup and replace worn ones to avoid damage.
Keep rugs slightly larger than leg footprint so edges don’t catch.
Position mats under sofas, tables, and chairs, and lift when cleaning to reach grout.
Follow this simple routine to maintain shine and prolong tile life.
- Felt pads
- Rubber leg bumpers
- Washable squares
Furniture Pads and Tips to Avoid Tile Scratches
Although you mightn’t notice them at first, the tiny felt pads under chair and couch legs can prevent costly scratches and keep tile looking new. Use quality pads for furniture protection and scratch prevention.
Tiny felt pads under furniture quietly prevent costly tile scratches—choose quality pads for lasting protection.
Clean under legs regularly to remove grit, replace worn pads every six months, and choose adhesive or slip-on styles that fit leg shapes.
For heavy pieces, add durable rubber or nylon glides to distribute weight.
Lift rather than drag furniture when rearranging.
Test new pads on an inconspicuous spot to avoid residue.
These simple steps keep tiles pristine and reduce long-term repair needs.
Handling Pet Accidents and Odors on Tile Floors
Because accidents happen, you’ll want a fast, targeted response that removes mess and neutralizes odors before they set into grout or sealer. Act quickly: blot solids, lift liquids with paper towels, then dab with a mild enzyme cleaner for odor elimination. Remove pet hair first so it doesn’t trap residue.
- Sweep or vacuum loose debris and pet hair.
- Treat stains with enzyme cleaner, let sit per instructions.
- Rinse with warm water and dry to prevent slip marks.
Finish by airing the room and using a neutral pH cleaner periodically to keep tiles fresh and stain-free.
Kid‑Proof Tile Cleaning Tips for Busy Households
Keep a small microfiber mop or absorbent cloth handy so you can do quick daily wipeups after snacks and spills.
Use non-toxic, plant-based cleaners that cut grease but won’t harm curious little ones who touch the floor.
Store all cleaning products and tools in a locked or high cabinet so kids can’t grab bottles or spray heads.
Quick Daily Wipeups
If you want floors that stay presentable between deep cleans, quick daily wipeups are your best defense against spills, crumbs, and sticky fingerprints from kids. You’ll move fast: grab a microfiber mop or cloth, focus on high-traffic zones, and protect decorative patterns by blotting rather than rubbing.
Pay attention to grout color where dirt shows most. Keep a small caddy with essentials near play areas.
- Spot-treat spills immediately.
- Sweep crumbs into a dustpan before mopping.
- Rinse and wring mop frequently to avoid smearing.
Do these daily and tiles stay brighter with minimal effort.
Non-Toxic Cleaners
When you’re juggling kids and chores, choosing non-toxic cleaners lets you tackle tile grime without worrying about fumes or residue. Pick simple, effective recipes: warm water with a splash of white vinegar for everyday mopping, or baking soda paste for grout spots.
Look for labeled eco friendly options in stores—plant-based detergents and citrus enzyme sprays work well. Test any new product on a small area first.
Keep cleaning sessions short and routine to prevent buildup. For households with pets, prioritize pet safe solutions and rinse surfaces lightly so floors stay shiny and safe for little feet and paws.
Kid-Safe Storage
After choosing non-toxic cleaners, store them where kids can’t reach to avoid spills and accidental exposure. You’ll want secure cabinets or high shelves and child proof storage latches, so curious hands can’t access bottles. Label containers clearly and keep cleaning tools together, away from play areas.
For busy households, combine safety with order by integrating cleaning supplies into your routine.
- Use locked cabinets or high hooks.
- Install child proof storage latches on lower doors.
- Keep a small, sealed caddy for quick mopping, stored out of sight.
Also coordinate Toy organization to separate play from cleaning zones.
Seasonal Deep‑Clean Checklist for Tile Floors
Although you clean regularly, a seasonal deep clean brings tile floors back to like-new condition by tackling grout buildup, seal wear, and hidden dirt in a focused session. You’ll check seasonal decor and adjust furniture placement to prevent abrasive wear. Move items, vacuum thoroughly, mop with pH-neutral cleaner, and inspect grout lines. Reseal tiles or grout if water beads instead of absorbing. Buff dry for shine and replace rugs strategically. Schedule this each change of season to extend tile life and maintain appearance.
| Task | Frequency |
|---|---|
| Vacuum & move furniture | Seasonal |
| Deep mop & inspect grout | Seasonal |
| Reseal & buff | Seasonal |
How to Remove Mildew and Mold From Tile Floors
Start by spotting where mold and mildew are coming from—check damp corners, grout lines, and any leaks so you can fix the source.
Use safe cleaning methods like a diluted bleach solution or a vinegar-baking soda mix.
Always ventilate the area and wear gloves.
Rinse thoroughly and dry the floor to prevent regrowth.
Identify Mold Sources
Where’s the mold coming from? You need to pinpoint mold sources to stop recurrence and treat tile discoloration effectively. Check common origins so you’ll address causes before cleaning.
- Leaks — inspect pipes, grout lines, and under sinks for slow leaks that feed mold.
- Poor ventilation — bathrooms and basements with trapped humidity promote growth on tiles and grout.
- Organic debris — soap scum, hair, and dirt collect moisture and harbor spores, causing patchy tile discoloration.
Document problem areas, dry and repair leaks, and improve airflow. Once you’ve identified sources, you’ll be ready for targeted, safer remediation steps.
Safe Cleaning Methods
Now that you’ve located the mold sources and fixed leaks or ventilation issues, you can safely tackle the affected tile areas with the right cleaning methods. Wear gloves and a mask, ventilate the room, and test a small area first.
For light mildew, mix equal parts white vinegar and water—spray, let sit 10 minutes, scrub with a brush, then rinse.
For stubborn mold, use a hydrogen peroxide spray (3%), wait 15 minutes, scrub, rinse.
Try eco-friendly solutions like baking soda paste for grout. These DIY cleaning hacks remove mold without harsh fumes; repeat as needed and keep areas dry.
Safe Bleach Alternatives for Stubborn Tile Stains
Looking for a safer way to tackle stubborn tile stains than straight bleach? You can use gentle, effective bleach alternatives for tile stain removal that won’t harm grout or fumes. Try these options, testing a small area first:
Looking for safer tile stain solutions? Try gentle, effective bleach alternatives—test a small area first.
- Baking soda paste: scrub with a damp cloth to lift grime without harsh chemicals.
- White vinegar solution: dilute 1:1 with water for mildew and surface stains, rinse thoroughly.
- Hydrogen peroxide spot treat: apply to tough grout discoloration, let sit, then scrub.
You’ll protect finishes and breathe easier while restoring tile appearance with household, less-toxic cleaners.
Signs You Should Call a Pro for Tile and Grout Restoration
If stains, cracks, or persistent mildew don’t respond to your cleaning efforts, it’s time to call a pro for tile and grout restoration. You should contact a specialist when grout crumbles, tiles lift, or color variations make repairs obvious. Professionals can assess structural issues, recommend sealants, and advise on installation tips for lasting results. Don’t wait if mold returns after cleaning or if large areas look uneven.
| Visible issue | When to call |
|---|---|
| Cracked or loose tiles | Immediate assessment |
| Persistent mildew | After repeated cleaning |
| Uneven color or grout loss | Before DIY fixes |
What a Professional Tile‑And‑Grout Cleaning Involves
What should you expect when a professional comes to clean your tile and grout? They’ll assess tile texture and grout color, then plan treatment. Technicians do thorough prep, safe cleaning, and finishing.
- Inspect: they note tile texture, damage, grout color variations and plan products.
- Clean: they use hot water extraction, agitation, and targeted cleaners to remove embedded dirt and stains.
- Seal/finish: they repair grout if needed, apply sealant, and buff tiles for consistent sheen.
You’ll get a cleaner surface, restored grout lines, and guidance on maintenance tailored to your floors.
Cost vs Benefit: DIY Tile Cleaning vs Professional Service
After a pro finishes assessment, cleaning, and sealing, you’ll be tempted to weigh doing it yourself next time against hiring experts again. Consider a clear cost comparison: DIY saves money upfront but costs time, effort, and potential mistakes; professionals cost more but deliver speed, equipment, and guarantees. Use this simple table to compare.
| DIY advantages | Professional service |
|---|---|
| Lower immediate expense | Faster, thorough results |
| Flexible scheduling | Specialized equipment |
| Learn maintenance skills | Warranty and liability |
| Time investment | Consistent long-term value |
Balance budget, skill, and urgency to decide what fits your home.
Eco‑Friendly Tile Cleaning Products That Really Work
While choosing cleaning products, think beyond sparkle and pick ones that protect your health and the planet; eco-friendly cleaners cut chemicals without sacrificing effectiveness. You’ll want formulas labeled eco friendly cleaning that remove grime, rinse clear, and boost Natural shine without waxy residue.
Try concentrated plant-based solutions or gentle enzyme cleaners for grout and tile. Follow these simple options:
- Mild vinegar solution for regular mopping (diluted).
- Castile soap with warm water for stubborn dirt.
- Enzyme spray for organic stains and grout.
Test any product in an inconspicuous spot, then mop and air-dry for best results.
How to Read Labels and Avoid Harmful Cleaning Ingredients
Because product labels pack a lot of information into a small space, you’ll want to scan them smartly: look for ingredient lists, hazard warnings, and eco-certifications. Note any chemicals you don’t recognize, and skip items that list fragrances, phosphates, or quaternary ammonium compounds (quats) high on the list.
Use label reading to compare products: prioritize simple ingredient lists, recognizable names, and third‑party eco seals. Practice chemical avoidance by rejecting labels that promise antibacterial power with unclear active agents or list sodium hypochlorite, ammonia, or strong acids.
When in doubt, choose mild, pH‑neutral cleaners and test a spot first.
Low‑Effort Daily Habits That Keep Tile Floors Shiny
If you adopt a few simple habits—wiping up spills immediately, sweeping or dry-mopping high-traffic areas each day, and placing doormats at every entrance—you’ll prevent grime buildup and keep tiles looking shiny with minimal effort.
Adopt simple habits—wipe spills, dry-mop daily, and use doormats—to prevent grime and keep tiles shiny.
You’ll notice how Tile patterns show better when surfaces stay clean and grout color stays true. Follow these quick, low-effort steps to maintain shine and protect finish:
- Shake or vacuum mats daily to stop tracked dirt.
- Spot-wipe spots with a microfiber cloth and mild cleaner.
- Run a light dry-mop across visible areas each evening.
Consistency keeps tiles bright without heavy scrubbing.
Quick Morning and Evening Tile Care Routines
When you start and end each day with a short tile-care routine, you’ll prevent buildup and keep grout looking fresh without extra work.
In the morning, sweep or vacuum high-traffic areas, spot-mop spills with a microfiber cloth and a plant-based cleaning spray, then air the room to reduce moisture.
In the evening, do a quick damp mop using warm water and eco-friendly solutions diluted per label, paying attention to grout lines. Rinse the mop and change water if it gets dirty.
These two brief steps take minutes but stop stains and make deep cleaning easier.
How to Create a Monthly Tile Maintenance Schedule
To keep tiles consistently clean without letting tasks pile up, set a simple monthly maintenance schedule that breaks work into manageable, focused actions. Plan one deeper task each week plus light daily care.
Keep tile care simple: one deeper weekly task, light daily upkeep, and a monthly routine to prevent buildup.
Note how historical trends and cultural influences shape product choices and routines so you pick appropriate cleaners.
- Week 1: deep clean grout and seal as needed.
- Week 2: buff and polish high-traffic areas; inspect for wear.
- Week 3: treat stains and reapply protective coatings if recommended.
Reserve Week 4 for inventory: restock supplies, note issues, and schedule professional help if required.
Common Mistakes That Dull Tile and How to Avoid Them
Keeping a monthly routine helps, but a few common missteps will still wear tile down faster than expected. Don’t use harsh cleaners or acidic solutions that strip sealant longevity and leave dull residue.
Avoid over-wetting grout; trapped moisture promotes grout discoloration and mildew. Skip abrasive pads that scratch the glaze—use soft mops and nonabrasive cloths instead.
Don’t neglect spills or tracked-in grit; they abrade surfaces if allowed to dry. Avoid mixing cleaners; residues can film the tile.
Finally, don’t postpone resealing grout and porous tiles—timely maintenance preserves appearance and prevents long-term damage.
Troubleshooting: Why Your Tiles Look Streaky and Fix It
If your tiles look streaky after cleaning, it’s usually due to residue, improper drying, or the wrong cleaner—so start by identifying what’s causing the film. Check for soap buildup, hard-water spots, or excess polish. Test a small area to see if streaks lift with plain water.
If tiles look streaky after cleaning, check for residue, hard-water spots, or wrong cleaner—and test a small area with plain water.
- Rinse with distilled water and dry immediately to prevent streaks and grout discoloration.
- Replace harsh chemicals that cause color fading; use pH-neutral cleaners sparingly.
- Buff with a microfiber cloth in circular motions to remove streaks and restore shine.
Repeat corrective steps until the finish looks even.
Best Storage and Handling for Tile Cleaning Products
After you’ve fixed streaks and rinsed surfaces, don’t overlook how you store and handle the cleaning products that got you there—proper storage keeps them effective and prevents accidents. You should use clear storage organization: keep chemicals upright, separate by type, and away from heat. Use product labeling with dates and dilution instructions so you and others know what’s inside. Keep gloves and a spill kit nearby. Lock cabinets if pets or kids roam. Check seals and discard expired solutions. Quick reference:
| Item | Location | Note |
|---|---|---|
| Mop solution | Upper shelf | Label date |
| Acid cleaner | Locked cabinet | Gloves required |
| Sealant | Cool area | Keep upright |
Upgrade Your Tile Cleaning Kit on a Budget
When you want better results without overspending, upgrade your tile-cleaning kit with a few targeted, budget-friendly tools and supplies that make chores faster and more effective.
Start with multipurpose cleaners you can dilute, choosing options that support Eco friendly techniques.
Add a microfiber mop and replaceable pads to trap grit and reduce water use.
Pick a grout brush with stiff bristles to tackle lines without harsh chemicals.
- Microfiber mop and pads
- Concentrated eco cleaner (dilutable)
- Stiff grout brush
These Budget friendly upgrades lower waste, save money, and boost shine efficiently.
Track Results and Tweak Your Tile Cleaning Plan
Though you’ve upgraded your kit, you’ll get the best results by tracking how each change affects cleanliness and shine. Note tile pattern and grout color when you log results, since porous grout or textured tile needs different methods. Test one variable at a time: cleaner, tool, pressure, or dwell time. Review weekly, compare photos, and tweak frequency or product strength based on streaks, residue, or wear.
| Date | Change | Outcome |
|---|---|---|
| 03/01 | New mop | Less streaking |
| 03/08 | Stronger cleaner | Whitener on grout |
| 03/15 | Longer dwell | Improved shine |
| 03/22 | Softer brush | Preserved tile pattern |
Frequently Asked Questions
Can Tile Floor Cleaners Damage Underfloor Heating Systems?
Yes — you can damage underfloor heating if you use harsh tile cleaning chemicals or excessive water; you should choose gentle products, follow manufacturer guidance, and prioritize heating system safety to avoid corrosion or electrical issues.
How Do I Remove Efflorescence From Outdoor Tiles?
Oh joy, white powder party! You’ll tackle efflorescence removal by dry-brushing, rinsing with mild acid solution (vinegar or diluted muriatic carefully), scrubbing, then sealing for outdoor tile cleaning to prevent recurrence.
Are Steam Mops Safe for All Grout Types?
They’re not universally safe; steam mops safety depends on grout compatibility, moisture sensitivity, and grout age. You’ll avoid damage on cement and sealed grout, but you shouldn’t use steam on unsealed, soft, or deteriorating grout.
How Often Should Tiles Be Professionally Sealed or Polished?
You should get tile sealing every 1–3 years and professional polishing every 2–5 years, depending on traffic and tile type; don’t wait—schedule inspections sooner if grout or sheen degrades, and contractors will recommend timing.
Can Waxes or Sealers Cause Slippery Tile Surfaces?
Absolutely — you’ll feel like you’re skating! If you’re careless, wax buildup or sealer residue can make tiles dangerously slippery, so you’ll need proper products and regular stripping to prevent slick, hazardous floors.
Conclusion
Stick with the simple weekly routine and you’ll keep tiles looking great without hassle. For example, Sarah swapped harsh cleaners for a mild pH-neutral solution and a microfiber mop; within two weeks her kitchen tiles stopped streaking and regained their gloss. Know your tile type, use the right tools, store products safely, and tweak techniques as you go. Small changes deliver big shine—commit to the plan and enjoy spotless, long-lasting floors.