
How to Install Backsplash Tile on Drywall Without Causing Water Damage
You can install a backsplash on drywall safely if you pick the right spot and prep properly. Work only in low‑moisture areas; patch, sand, and prime the wall, snap layout lines, and dry‑fit tiles. Use moisture‑resistant tile and thinset, keep joints uniform with spacers, and grout fully. Seal grout with a penetrating sealer and caulk all countertop and exposed edges with flexible, mold‑resistant silicone. Follow these steps and you’ll avoid leaks—keep going to see detailed tips and alternatives.
Can You Install Backsplash Tile Directly on Drywall Without Causing Water Damage?
You can in some cases install backsplash tile directly on drywall, but it’s only safe if the area won’t see regular splashes or steam.
It’s acceptable for low-moisture spots like behind a stove with light use, but not around sinks or dishwashers where moisture exposure is frequent.
Take these precautions: use cement board or a waterproof membrane in wet zones, seal seams and grout, and pick moisture-resistant tile and adhesive.
Short, actionable verdict
Yes—with the right prep. You can install backsplash tile on drywall without water damage if you follow proper steps: clean and prime, use cement backer board or waterproof membrane where splash risk is high, apply quality thinset, and seal grout.
Do the prep, follow manufacturer instructions, and you’ll protect drywall while achieving a durable, attractive backsplash.
When it’s acceptable and when it’s not
That verdict holds most of the time, but there are clear limits where drywall alone won’t cut it.
You can tile directly over clean, dry, undamaged drywall in low-splash areas.
Don’t in zones exposed to constant moisture, behind sinks with poor seals, or where the drywall is soft or moldy.
In those cases, use a proper water-resistant backing.
One-sentence list of essential precautions
If you’re tiling over drywall, follow these essential precautions:
- Use cement backer board or waterproof membrane behind tiles to block moisture.
- Seal seams, corners, and penetrations with waterproof tape and appropriate sealant.
- Choose tile adhesive and grout rated for wet areas and apply correctly.
- Slope countertops slightly and caulk the joint to prevent water intrusion and rot.
Basic Understanding What Causes Water Damage Behind Backsplashes?
You need to know how moisture behaves with drywall so you can prevent rot and mold behind your backsplash.
Common sources like sink splashes, steam from cooking, and plumbing leaks each expose the wall differently.
Learn the difference between occasional splashes, slow seepage through grout or joints, and full flood-level exposure to choose the right materials and protections.
How moisture interacts with drywall
Moisture finds its way behind backsplashes through tiny gaps, porous grout, or plumbing leaks. When it reaches drywall, it soaks into the paper facing and gypsum core, weakening the board and inviting mold.
You’ll notice swelling, crumbling, and loss of fastener grip as wet drywall loses strength. Address moisture quickly to prevent structural compromise and hidden microbial growth.
Common sources of water exposure in backsplash areas
Because drywall soaks up water and shows damage quickly, it helps to know exactly where that water comes from.
You’ll encounter leaks from plumbing lines, faucet splashes, condensation from kettles or dishwashers, and spills that run down counters.
Poor grout or caulk lets moisture penetrate behind tiles.
Identifying these sources lets you target sealing, waterproofing, and routine habits to prevent damage.
Difference between splash, seepage, and flood-level exposure
Although all three involve water, splash, seepage, and flood-level exposure affect your backsplash in very different ways:
splash is brief, surface wetting from pots or splatters that dries quickly;
seepage is slow, hidden moisture tracking through grout, caulk, or seams and causing mold or soft drywall;
flood-level exposure is prolonged, high-volume water that saturates drywall, ruins adhesive, and demands immediate remediation.
Materials and Tools You Need Before Starting
Before you start, you’ll want to pick the right tile—porcelain and glazed ceramic resist moisture better than unglazed options.
You’ll also need the proper adhesives, a waterproofing membrane or sealant, and a suitable cement backer board for wet-prone areas.
Finally, gather a tools checklist—trowels, spacers, a wet saw or tile cutter, a level, and a few handy accessories like sponge and buckets.
Tile types and why some are better for moisture-prone areas
When you’re choosing backsplash tile for moisture-prone areas, pick materials that resist water, stains, and mold—porcelain, glass, and certain glazed ceramic tiles are your best bets because they’ve low porosity and durable surfaces.
- Porcelain: dense, low absorption.
- Glass: nonporous, easy to clean.
- Glazed ceramic: affordable, moisture-resistant.
- Natural stone (sealed): stylish but needs maintenance.
Adhesives, waterproofing membranes, sealants, and backer boards
1 key to a long-lasting backsplash is choosing the right adhesives, waterproofing membranes, sealants, and backer boards for your tile and environment.
You’ll pick materials based on tile type and moisture exposure. Consider:
- Thinset rated for your tile
- Cement backer board or Wedi foam
- Waterproof membrane (liquid or sheet)
- Silicone sealant for joints and edges
Tools checklist and useful accessories
Gather the right tools and accessories so you can work efficiently and avoid unnecessary trips to the store; you’ll need basic hand tools plus a few tile-specific items to get professional results.
- Tape measure, pencil, level, straightedge.
- Notched trowel, grout float, rubber mallet.
- Tile cutter or wet saw, tile nippers.
- Sponge, buckets, painter’s tape, caulk gun.
Step-by-Step Installation Guide
Before you start tiling, assess the wall and check the drywall for damage so you know what substrate you’ll need.
Pick drywall, cement backer board, or a waterproof backer, then clean, prime, and repair the surface as needed.
After installing any required waterproofing, lay out and mark your tile pattern, spacing, and cuts so the installation goes smoothly.
Step 1 Assess the site and existing drywall condition
When you’re getting ready to install a backsplash, take a close look at the wall and drywall to make certain the surface is flat, dry, and free of loose paint or wallpaper.
Check for soft spots, mold, or water stains. Measure and mark the area, note outlets or trim, and guarantee studs or furring are accessible for secure fastening before you proceed.
Step 2 Choose between drywall, cement backer board, or waterproof backer
Now that you’ve inspected the wall and marked the layout, decide which substrate will give you the best long-term performance for your backsplash.
If the drywall is sound and tiles are small, you can often tile directly.
For moisture-prone areas choose cement backer board or a waterproof backer.
Consider tile weight, exposure to splashes, and countertop junction when selecting the substrate.
Step 3 Prepare the wall: cleaning, priming, and repairing drywall
Step 3 covers the prep work you’ll do to get a smooth, stable surface: clean off grease and dust, sand or scrape loose paint, patch any holes or dents, and prime the drywall so adhesives bond properly.
Remove fixtures, wipe with degreaser, sand rough spots, fill gaps with joint compound, sand smooth when dry, then apply a drywall primer recommended for tile adhesives.
Step 4 Install a waterproofing layer (liquid membrane, sheet membrane, or cement board)
Protect the wall with a waterproofing layer before you install tile—choose a liquid membrane, a peel-and-stick sheet, or cement backerboard based on your budget, moisture exposure, and substrate.
Apply liquid membranes with a roller in two coats, seam and fastener-treat sheet membranes, or screw and tape cement board joints.
Confirm full coverage, cure times, and manufacturer details before tiling.
Step 5 Layout and mark tile pattern, spacing, and cuts
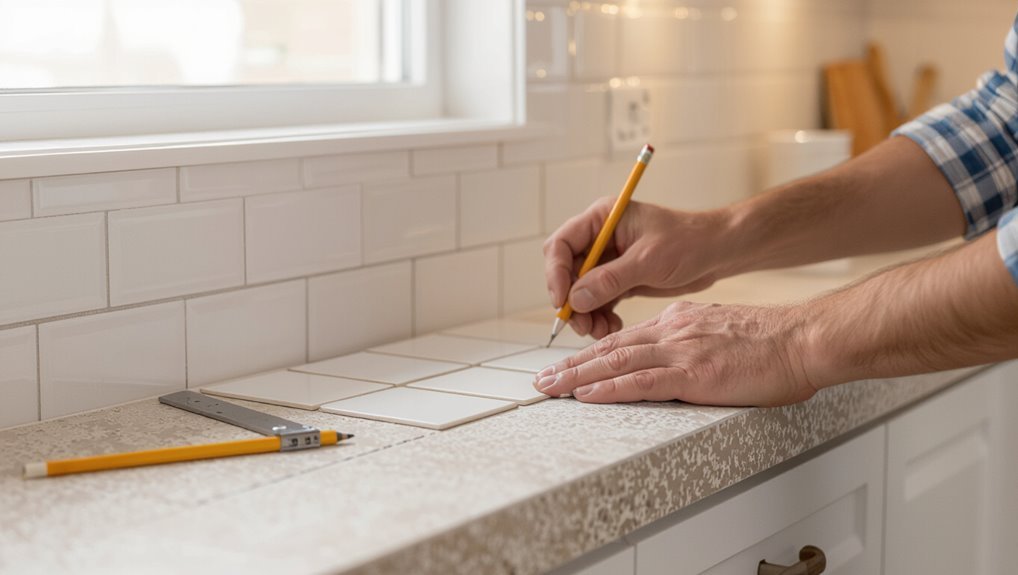
Before you set a single tile, lay out the pattern and mark spacing and cut lines so the installation runs smoothly and looks balanced.
Measure and snap reference lines at center and ends, dry-fit tiles across the field, and note partial pieces.
Mark precise cut lines on tiles, transfer measurements from walls and outlets, and plan grout joint width so edges and corners align neatly.
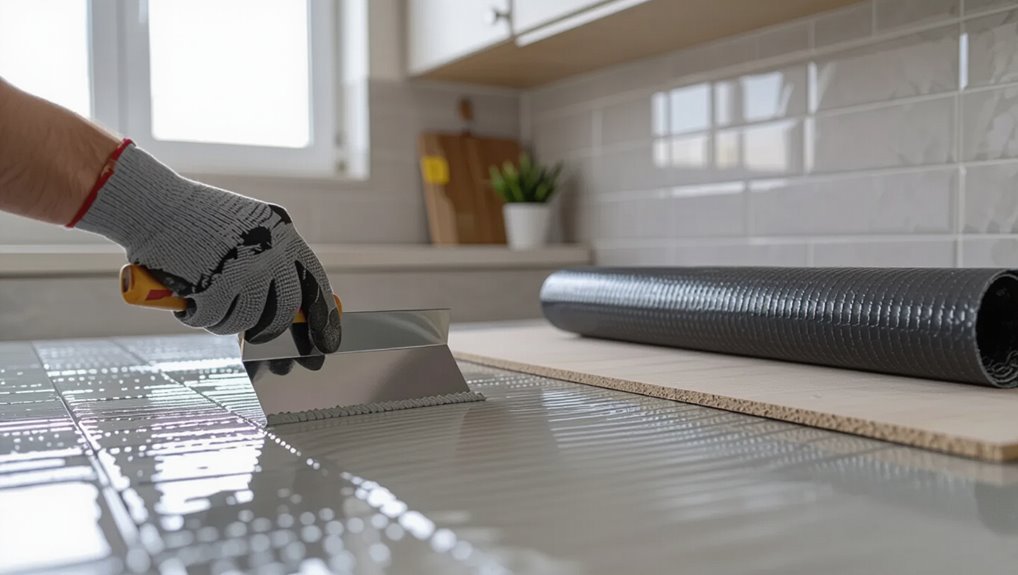
Step 6 Apply thinset, set tiles, and maintain consistent grout lines
Mix and apply a thin, even layer of mortar with a notched trowel, then press each tile into place while keeping spacer-aligned grout joints consistent—work in small sections so the thinset doesn’t skin over before tiles are set.
Tap tiles with a rubber float to bed them, check alignment frequently, remove excess mortar, and clean joints so spacing stays uniform until the mortar cures.
Step 7 Grout application, sealing grout, and edge finishing
Once the thinset has cured enough to hold the tiles firmly, you’ll move on to grout, sealing the grout lines, and finishing exposed edges to give the backsplash a clean, durable look.
Mix grout to manufacturer specs, force into joints, then wipe excess with a damp sponge.
After full cure, apply a penetrating grout sealer and install trim or metal edge profiles for a neat, water-resistant finish.
Step 8 Install caulk at joins and finally cure/dry time recommendations
When the grout’s fully cured and trim’s in place, you’ll run a bead of flexible, mold-resistant silicone or acrylic caulk along all joints where the backsplash meets countertops, cabinets, or any change in plane to create a watertight, flexible seal.
Smooth with a damp finger or tool, remove excess, and let the caulk cure per manufacturer instructions—typically 24–48 hours—before exposing to moisture.
Alternatives and When to Use Them
You’ll weigh choices like cement backer board, moisture-resistant drywall, or tiling directly over drywall based on heat and moisture exposure.
Prefabricated waterproof panels and other non-tile options can save time and reduce water-risk in busy zones.
And if your layout is complex or you want guaranteed waterproofing, you’ll want to hire a pro rather than attempt a tricky DIY.
Use of cement backer board vs. moisture-resistant drywall vs. direct drywall tiling
Although all three options can work, choosing between cement backer board, moisture-resistant drywall, or tiling directly over regular drywall comes down to moisture exposure, budget, and permanence. You’ll pick backer board for wet zones, greenboard for splash-prone areas, and direct drywall only for low-risk spots.
| Option | Best use | Cost/effort |
|---|---|---|
| Backer board | Wet/splashes | Higher |
| Greenboard | Light splash | Moderate |
| Direct drywall | Dry areas | Lowest |
Prefabricated waterproof panels and backsplash alternatives
If you want a faster, lower-mess alternative to tile, prefabricated waterproof panels give you a ready-made backsplash that’s durable and easy to install.
You can pick panels or other alternatives based on style, budget, and moisture exposure. Consider:
- PVC panels — lightweight, water-resistant
- Acrylic sheets — sleek, low-maintenance
- Laminate — budget-friendly
- Stainless steel — professional look, hygienic
Professional installation vs. DIY: when to hire a pro
Prefabricated panels and other non-tile options can cut time and mess, but decide whether you’ll handle installation yourself or hire a pro based on skill, tools, and the job’s complexity.
If you lack tiling experience, precise cuts, or waterproofing know-how, hire a pro to avoid leaks and costly repairs.
DIY suits straightforward, small projects when you’re confident and properly equipped.
Common Mistakes That Lead to Water Damage
Don’t skip proper waterproofing or use products that aren’t rated for wet areas, because that’s how moisture starts behind the tile.
Watch seams, joints, and exposed edges—if they’re left unsealed or poorly finished, water will find its way in.
Use the right adhesive and grout, allow full curing, and caulk the countertop-to-wall junction correctly so you’re not fixing leaks later.
Skipping waterproofing or using wrong products
While a backsplash might look finished the moment the tiles are set, skipping proper waterproofing or using the wrong sealants invites leaks, mold, and costly repairs down the line.
You must choose a moisture-resistant membrane or primer suited for drywall, use tile adhesives and grout rated for wet areas, and apply the correct silicone sealant at junctions to prevent water intrusion and long-term damage.
Improper seams, joints, and unsealed edges
If seams, joints, and edges aren’t properly sealed, water will find its way behind the tile and start degrading drywall, backerboard, and framing; you’ll spot stains, soft spots, or mold long before structural rot becomes obvious.
Seal connections, corners, and gaps with appropriate flexible sealant and waterproof tape. Maintain consistent joint widths, caulk movement joints, and inspect seals periodically to catch failures early.
Using the wrong adhesive or grout and poor curing
When you pick the wrong adhesive or grout—or let them cure improperly—the bond fails and water gets a direct path behind the tile, causing stains, mold, and eventually rot.
Choose products rated for wet areas and compatible with your tile and drywall. Mix to manufacturer specs, apply evenly, and allow full cure time before exposing to moisture.
Inspect and repair soft or hollow spots promptly.
Incorrect caulking technique and overlooked countertop-to-wall junctions
Don’t skimp on caulking or assume the seam where your countertop meets the wall will take care of itself—poor technique and missed joints let water sneak in and cause damage.
Inspect the entire junction, apply a continuous bead of high-quality silicone, tool it smooth into the gap, and wipe away excess.
Re-caulk any gaps after movement or wear to maintain a watertight seal.
Prevention, Maintenance, and Best Practices
Keep a simple inspection checklist to spot grout cracks, loose tiles, or small leaks before they get worse.
Use a quality silicone or urethane sealant and re-seal grout every 1–2 years, and handle quick patches for small leaks with waterproof caulk while replacing damaged materials when repairs don’t hold.
Improve ventilation and wipe countertops dry after use to cut moisture exposure and extend your backsplash’s life.
Regular inspection checklist for leaks and grout integrity
Because small issues usually start out subtle, you should inspect your backsplash regularly for leaks, cracked or missing grout, and loose tiles to catch problems before they worsen.
- Look for discoloration or damp spots behind outlets and seams.
- Probe grout lines gently for crumbling.
- Check tile edges and corners for movement.
- Test nearby cabinets and drywall for softening or warping.
Best sealants and how often to re-seal grout
Several effective sealants can protect your grout and extend tile life, but choosing the right one depends on tile type, exposure, and the look you want.
For most kitchen backsplashes, a penetrating (silane/siloxane) sealer works well because it repels water and oils without changing the tile’s appearance.
In contrast, topical (film-forming) sealers offer stronger surface protection for high-use areas or porous decorative tiles.
Use penetrating sealers annually; reapply topical sealers every six months.
Quick fixes for small leaks and when to replace materials
If a small leak shows up behind your backsplash, act quickly to stop water from reaching the wall or cabinet cavity—dry the area, remove any loose grout or caulk, and apply a bead of silicone caulk or a grout patch to seal the gap.
Monitor the repair; if staining, mold, soft drywall, or recurring leaks appear, remove affected tile and drywall, replace with moisture-resistant materials, and retile.
Ventilation and countertop care to minimize moisture exposure
Good ventilation and regular countertop care will go a long way toward keeping moisture from seeping into your backsplash and causing damage.
Use a range hood or exhaust fan when cooking, open windows for steam, and wipe spills immediately.
Seal porous countertops and caulk gaps where counters meet backsplash.
Inspect seals monthly and reapply caulk or sealant at the first sign of wear.
Cost, Time, and Durability Considerations
You’ll want to weigh typical cost ranges for DIY versus hiring a pro so you can set a realistic budget.
Plan the estimated time for each step—surface prep, tiling, grout—and an overall project timeline to fit your schedule.
Also consider longevity by material and upkeep, since durable tiles plus regular maintenance can extend the life of your backsplash.
Typical cost ranges for DIY vs. pro installation
Installing a backsplash yourself can cut costs dramatically, but hiring a pro often buys speed and a near‑guaranteed finish—so weigh your budget against your skills. You’ll spend less on materials+tools DIY ($50–$400) but more time; pros charge $300–$1,200+ for labor and expertise. Choose based on complexity, tile type, and risk tolerance.
| Option | Typical Cost | Notes |
|---|---|---|
| DIY low | $50–$200 | Simple tiles |
| DIY high | $200–$400 | Specialty tiles/tools |
| Pro low | $300–$600 | Small jobs |
| Pro high | $600–$1,200+ | Complex installs |
Estimated time for each step and total project timeline
A typical backsplash project breaks down into prep, tile layout, installation, grout, and cleanup, and you can expect each phase to take from 30 minutes to several hours depending on scope and experience.
Plan: prep 1–2 hours; layout 30–90 minutes; tile setting 2–6 hours (or longer for intricate patterns); grout 1–2 hours plus curing; cleanup 30–60 minutes.
Total: 6–12+ hours.
Longevity expectations by material and maintenance level
Although lifespan varies by material and upkeep, you can expect clear differences: ceramic and porcelain tiles often last decades with minimal care.
Natural stone performs well but needs sealing and occasional maintenance.
Glass resists stains yet shows chips more readily, and metal or wood options require more frequent touch-ups or refinishing.
Choose materials matching your budget, traffic, and willingness to reseal, repair, or refinish over time.
Real-World Scenarios and Case Notes
You’ll see different needs depending on the situation: a low-splash kitchen can be handled on drywall with basic prep, while a high-use sink area calls for full waterproofing and a more robust substrate.
If you’re removing old tile and find water-damaged drywall, plan for repair or replacement before re-tiling.
Use these case notes to pick materials and techniques that match each scenario.
Scenario 1 Low-splash kitchen backsplash on drywall (DIY approach)
Start by measuring the wall and planning a simple layout that keeps the tile low—usually 4–6 inches above the countertop—for a clean, splash-resistant strip that’s easy to install on drywall.
Use cement-based thinset, back-butter large tiles, and stagger joints. Seal grout with a penetrating sealer, caulk the bottom seam, and avoid direct water exposure; spot-clean promptly to prevent stains.
Scenario 2 High-use sink area requiring full waterproofing
If your backsplash will be exposed to frequent water—think heavy cooking, dishwashing, or a pot filler—plan for a fully waterproof assembly rather than the low, drywall-mounted strip described above.
Use cement backerboard or exterior-grade plywood sealed with waterproofing membrane, waterproof thinset, and grout.
Flash at seams, seal penetrations, and slope counters slightly.
Consider integrated metal flashing and a continuous membrane behind tile.
Scenario 3 Repairing water-damaged drywall after tile removal
1 common situation after removing a backsplash is discovering water-damaged drywall that needs more than a simple patch; you’ll assess the extent of rot, mold, and compromised studs before deciding whether to cut back to clean material or replace the whole section.
- Stop moisture source.
- Remove damaged drywall.
- Inspect and treat framing.
- Install mold-resistant backer, tape, mud, then re-tile.
FAQ Common Questions About Installing Backsplash Tile on Drywall
Wondering about tiling over painted drywall, whether to pull out old drywall, or when your new grout can get wet?
You’ll also want to know if cement backer board is always required and how to spot early water damage behind a backsplash.
I’ll answer those common questions so you can make the right call for your project.
Can I tile directly over existing painted drywall?
When you’re considering tiling a backsplash over painted drywall, the short answer is: usually you can, but preparation matters.
Clean grease and sanding glossy paint improves adhesion. Remove loose or flaking paint and fill holes; prime with a bonding primer.
Use the right thin-set or mastic specified for painted surfaces and follow manufacturer cure times to prevent tiles from popping or moisture problems down the line.
Do I need to remove drywall behind an old backsplash?
If the old backsplash is sound and the drywall behind it shows no signs of water damage, mold, or crumbling, you usually don’t have to tear it out—just remove the tile or backsplash material, clean and repair the surface, and prep it for the new tile.
If you find soft spots, stains, or delamination, cut out and replace affected drywall, then install a moisture-resistant backer before tiling.
How long should I wait before exposing new grout to water?
Whether you left the drywall in place or replaced a damaged section, you’ll want to protect fresh grout from moisture while it cures.
Wait at least 24–48 hours before light splashing, but hold off on heavy exposure or cleaning for 72 hours.
For best results, follow the grout manufacturer’s instructions and seal grout after the full cure time, usually 7 days.
Is cement backer board always necessary behind tiles?
Do you always need cement backer board behind backsplash tile? Not always.
For low-moisture areas and small, lightweight tiles you can tile directly over properly primed, intact drywall using an appropriate thinset.
However, behind sinks or where water exposure is likely, backer board or a waterproof membrane gives better support and moisture protection.
Choose based on tile type, area use, and moisture risk.
What are the signs that water damage is already happening behind my backsplash?
How can you tell water’s already doing harm behind your backsplash? Look for bubbling, peeling, or discolored paint; soft, sagging drywall; musty or moldy odors; visible mold spots around seams or grout; persistent dampness after cleaning; or tiles that loosen or grout that cracks.
Cut a small inspection hole if unsure; brown stains and warping are clear signs you need repairs now.
