
Can You Tile Over a Laminate Floor? What Pros Say Before You Start
You can tile over laminate, but only if the existing floor is rigid, firmly bonded, level, and dry; pros warn that floating or damaged laminate, excess deflection, and moisture risks mean you should remove or reinforce it first. You’ll need to clean and de‑gloss the surface, fasten or replace unstable boards, and install a cement backer or uncoupling membrane with polymer‑modified thinset. Follow manufacturer specs carefully to protect warranties — continue for step‑by‑step prep, materials, and pro tips.
Can You Tile Over a Laminate Floor? Quick Answer and When It’s Possible
Yes — you can tile over laminate in some cases, but it’s not always the best choice.
Tiling can give you durability and a fresh look, yet it adds height, requires a stable subfloor, and may be harder to remove later.
Check that the laminate is firmly glued, level, dry, and supported by a sound substrate before you proceed.
Direct short answer
Wondering if you can tile over laminate? You can, but only in specific situations.
If the laminate is flat, firmly bonded, and not water-damaged, you can tile over laminate floor after proper preparation: clean, scuff, and use a suitable primer or underlayment.
If it’s loose, warped, or glued to particleboard subfloor, remove it first to guarantee a durable tile installation.
One-sentence summary of pros and cons
If your laminate is flat, firmly attached, and undamaged, you can save time and cost by tiling over it after proper prep (cleaning, scuffing, and using a primer or uncoupling membrane).
But if it’s loose, warped, or glued to a weak subfloor you’ll need to remove it to avoid tile failure and moisture issues.
You’ll gain speed and less demo, but risk height, adhesion, and repair complications.
Decision checklist when tiling over laminate is acceptable
When you’re deciding whether to tile over existing laminate, run through a short checklist that focuses on surface condition, substrate integrity, and height or changeover constraints.
- Is laminate firmly adhered with no movement?
- Is subfloor structurally sound and level?
- Can you meet finished floor height and threshold alterations?
- Is moisture risk low or manageable with underlayment?
If any answer is no, don’t tile directly.
Basic Understanding What Laminate Flooring Is and Why It Matters
You need to know laminate’s layered construction—wear layer, printed decor, core (often HDF), and backing—because each layer affects how it handles weight and moisture.
That behavior matters when you add tile, since laminate can flex, expand, or trap moisture under a rigid tile layer.
Also check the substrate and underlayment type (direct-bond, floating, foam, or plywood subfloor) to judge stability and whether prep or removal’s required.
Construction and layers of laminate floors
Understanding laminate flooring starts with its layered construction: a protective wear layer, a printed design layer that mimics wood or stone, a high-density fiberboard (HDF) core for stability, and an underlayment or backing that adds moisture resistance and cushioning.
You’ll also note bevels, click-lock edges for floating installation, and varying wear ratings; these affect durability and replacement options when planning any covering.
How laminate behaves under tile (stability, movement, moisture)
Having covered laminate’s layered makeup, it helps to look at how that construction performs when you cover it with tile.
Laminate can flex and expand with humidity and temperature, so it may move under rigid tile. That movement risks grout cracking and tile lippage.
Moisture can swell the core, reducing stability. You’ll need to assess condition and limit moisture before tiling.
Common laminate substrates and underlayment types
Because laminate floors sit on a variety of substrates and underlayments, knowing what’s beneath the planks matters when you’re planning to tile over them.
You’ll commonly find plywood, OSB, concrete, particleboard, and existing vinyl. Underlayments include foam, cork, felt, and moisture barriers.
Each affects adhesion, flatness, and moisture control, so inspect and replace unsuitable layers before tiling.
Conditions That Determine Feasibility
Before you decide to tile over laminate, check a few key conditions: the joists and subfloor must be stiff with minimal deflection, the laminate should be sound with tight seams and secure edges, and moisture levels must be controlled.
You’ll also need to evaluate added height and how new connections and thresholds will align. These factors together determine whether tiling is practical or if removal is the safer choice.
Structural soundness: joists, subfloor, and deflection limits
If your floor framing and subfloor aren’t stiff and intact, new tile won’t stay put or could crack.
So you need to check joist spacing, subfloor material and thickness, and overall deflection before you tile over laminate.
Measure span and joist spacing, confirm subfloor species and minimum thickness, and calculate or test deflection (L/360 for tile).
Reinforce or replace weak framing first.
Laminate condition: wear, seams, and adhesion
When you assess the laminate’s condition, focus on surface wear, seam integrity, and how well the planks adhere—these factors decide whether tiling over it’s workable or risky.
Check for deep scratches, delamination, loose or lifting seams, and any planks that shift under pressure.
You’ll need a flat, firmly bonded surface; otherwise remove or repair the laminate before tiling.
Moisture and vapor concerns
Because moisture moves through flooring assemblies, you’ll need to evaluate both surface dampness and underlying vapor sources before tiling over laminate.
Check for prior water damage, plumbing leaks, and high indoor humidity. Use a moisture meter and test adhesive compatibility with residual moisture.
If vapor drive exists, install an appropriate vapor barrier or consider removing the laminate to prevent tile bond failure and mold.
Height, transitions, and threshold constraints
Though you can often tile over laminate, check the finished floor height carefully because added tile, thinset, and backerboard can create problematic step-ups at doorways and thresholds.
You’ll need to plan changes, threshold plates, and door clearances so doors swing freely and meet code.
Consider:
- Total buildup height
- Transition strips
- Door trimming
- ADA or code limits
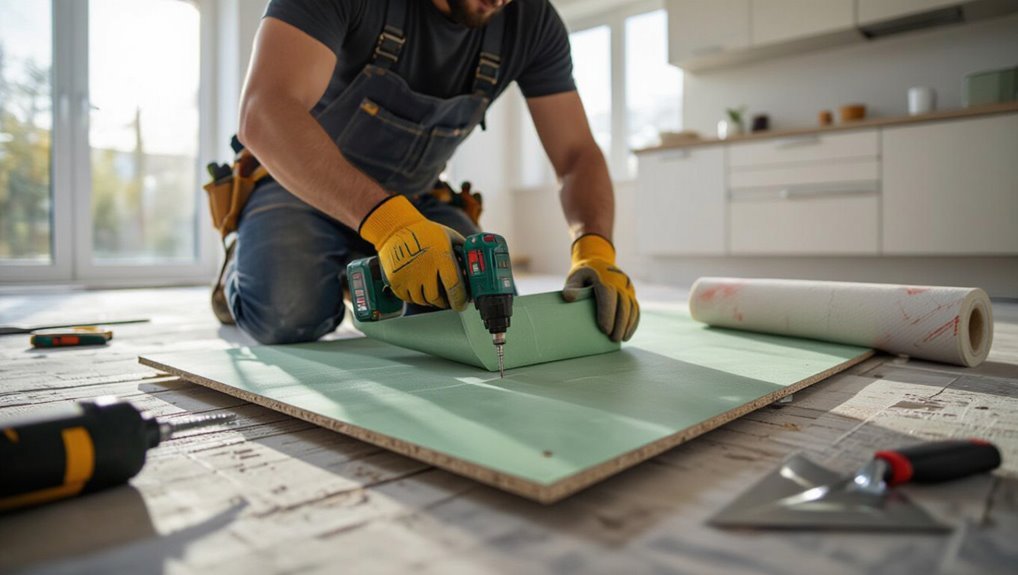
How Professionals Prepare for Tiling Over Laminate (Step-by-step)
Before you start tiling over laminate, you’ll inspect and measure the floor for deflection and levelness to confirm it can hold tile.
Then you’ll clean, de-gloss, and repair the surface, secure or remove any floating boards, and add reinforcement like cement backer board or an uncoupling membrane.
Finally, you’ll select and apply the proper thinset or adhesive to guarantee a durable bond.
Step 1 Inspect and measure for deflection and levelness
Step 1 is to inspect and measure the laminate subfloor for deflection and levelness so you know whether it can support tile.
Check for bounce by walking and using a straightedge and 1/4″ rule—maximum deflection L/360.
Measure high and low spots with a laser level or long level.
Document readings; anything beyond tolerance needs structural reinforcement before tiling.
Step 2 Clean, de-gloss, and repair the laminate surface
Now that you’ve checked for deflection and levelness, prepare the laminate surface by removing dirt, oils, and the factory sheen so tile adhesives will bond.
Clean with a degreasing cleaner, rinse and dry thoroughly.
Sand glossy areas with fine-grit paper or a deglosser, vacuum residue, and wipe with tack cloth.
Fill chips or gaps with a compatible epoxy or wood filler, then sand smooth.
Step 3 Address movement: fasten or remove floating laminate
Someone’s got to stop the floor from moving—tile won’t tolerate the flex of a floating laminate, so you’ll either fasten it down or pull it up.
If fastening, screw through planks into joists at seams, glue connectors, and eliminate gaps.
If removing, lift planks, clear underlayment, and inspect subfloor for flatness and damage.
Choose based on stability and cost.
Step 4 Install reinforcement (cement backer board or uncoupling membrane)
With the laminate secured or removed, you’ll want to add a rigid, stable layer that prevents tile and grout from cracking over any remaining movement-prone substrate.
Install cement backer board screwed and taped, or lay an uncoupling membrane to isolate movement. Seal seams, screw patterns, and connections per manufacturer instructions.
Confirm flatness and firm fastening before tiling to avoid future failures.
Step 5 Choose and apply the correct thinset or adhesive
Select the correct thinset or tile adhesive carefully—it’s what bonds your tile system to the backer and prevents future failures.
Use a polymer-modified thinset for cement backer boards and an adhesive specified for uncoupling membranes.
Mix to manufacturer consistency, apply with the right trowel notch, and butter tiles when required.
Work in small sections and follow pot life and cure times precisely.
Step 6 Tile layout, spacing, and grout selection
After the thinset is spread and tiles are buttered where needed, plan your layout to minimize cuts and keep grout lines balanced across visible runs.
Snap reference lines, dry-lay edge tiles, and stagger joints if using rectangular tiles.
Choose grout width based on tile size and movement expectations, pick sanded or unsanded accordingly, and select a color that camouflages joints and suits traffic levels.
Step 7 Final finishing, transitions, and sealing
1 final pass ties the job together: you’ll clean the tiles and grout, install thresholds, and seal grout and edges so the new floor performs and looks professional.
Wipe haze, tighten grout lines if needed, and apply a penetrating sealer.
Fit junction strips at doorways, silicone around fixed walls or cabinets, and inspect for lippage.
Let curing times finish before foot traffic.
Materials, Tools, and Products Pros Recommend
Before you start, you’ll want to know which underlayments or cement backer boards pros trust and which adhesives, thinsets, and primers bond well to laminate.
You’ll also weigh tile types and sizes that perform reliably over a floating floor and gather a compact tools checklist for a professional-quality install.
Next, we’ll cover specific product recommendations and why experts pick them.
Best underlayments and backer boards for this job
When you’re planning to tile over laminate, choosing the right underlayment or backer board is critical to guarantee a stable, moisture-resistant base that bonds well with thinset and tile.
Pick materials that add rigidity, decouple movement, and resist moisture.
Consider these options:
- Cement backer board (Durrock, HardieBacker)
- Uncoupling membrane (Schluter Ditra)
- Fiber cement board
- Waterproofing membrane underlayment
Adhesives, thinsets, and primers suitable for laminate surfaces
Choosing the right underlayment sets the stage, but the bond between tile and laminate depends on adhesives, thinsets, and primers you pick.
Use a high-strength, flexible polymer-modified thinset rated for non-porous surfaces. Apply a bonding primer or latex-promoting primer to the laminate first.
For peel-and-stick tiles, choose pressure-sensitive adhesives designed for vinyl/laminate substrates and follow manufacturer cure times strictly.
Tile choices and sizes that work best over laminate
Tile size and material affect weight, flexibility, and installation ease, so pick options that suit the laminate’s limitations and your skill level.
Choose lightweight porcelain or ceramic mosaics and small-format tiles (2×2 to 8×8 inches) to reduce stress and bending. Avoid very large slabs or heavy natural stone unless you’ve reinforced the subfloor.
Use rectified edges for tighter grout lines.
Tools checklist for a professional-quality installation
A clear, well-organized toolkit makes the difference between a frustrating weekend project and a pro-quality installation, so gather these essentials before you lift a finger:
- Quality thinset and primer designed for laminate
- Notched trowel, grout float, tile spacers
- Wet saw or tile cutter, leveling system
- Moisture barrier, measuring tools, safety gear
You’ll work faster and avoid costly mistakes.
Comparison: Tiling Over Laminate vs. Removing Laminate First
You’ll want to weigh cost, time, and long-term performance before deciding whether to tile over laminate or strip it out first. Below is a quick comparison to help you spot when removal’s worth the extra work and when overlaying might be an acceptable shortcut.
| Factor | Quick takeaway |
|---|---|
| Cost & labor | Tiling over is cheaper/fast; removal raises labor and disposal costs |
| Longevity & risks | Removal often yields better adhesion and fewer failures |
Cost comparison
One clear cost trade-off when deciding whether to tile over laminate or remove it first is labor: leaving the laminate saves demo time and disposal fees but can raise installation complexity and long-term repair costs.
You’ll spend less upfront if you tile over, yet adhesive, leveling products, and potential premature tile failure can increase lifetime expenses.
Removing laminate raises initial cost but often lowers future maintenance.
Time and labor comparison
Tiling over laminate usually takes less demo time, but it can add prep work that eats into the savings; removing laminate first extends the project schedule upfront but simplifies the tile install and often speeds later stages.
You’ll save initial labor by leaving laminate in place, yet expect extra leveling, underlayment fitting, and adhesive care.
Removing laminate costs time but reduces on-site complexity and crew hours later.
Longevity and performance comparison
When you compare longevity and performance, removing the laminate first usually gives a more durable, trouble-free tile installation because you’re bonding directly to a solid subfloor and can correct any structural issues beforehand.
Tiling over laminate can work short-term but raises risks: adhesive failure, hollow spots, and movement.
If you want long-lasting, low-maintenance tile, removing laminate pays off.
When removal is the better choice (situations and red flags)
If your laminate is buckled, loose, water-damaged, or installed over an uneven or unknown subfloor, you should remove it rather than tile over it.
You’ll also strip laminate that’s glued down, contains mold, or sits over rotted joists.
Removing guarantees a stable, level substrate, corrects height changes, and prevents future tile failure.
Don’t gamble—inspect and remove when these red flags appear.
Common Problems and Mistakes to Avoid
When you tile over laminate, you’ll run into issues like movement and subfloor deflection that can crack grout and tiles.
You’ll also see adhesion failures from improper surface prep and moisture problems that invite mold.
Avoid typical DIY errors—professionals control flatness, use proper underlayment and adhesives, and manage moisture before tiling.
Problems caused by movement and subfloor deflection
Because laminate and tile move differently, installing tile over a flexible laminate can lead to cracked grout, popped tiles, and a compromised finish.
So you need to understand how subfloor deflection and lateral movement will affect a rigid tile assembly. If the substrate dips, flexes, or shifts with traffic or temperature, tile and grout will fail.
Reinforce or replace the subfloor before tiling.
Adhesion failures and how they occur
Although the materials look compatible, adhesion failures are among the most common problems when you try to tile over laminate.
They usually start with poor surface preparation, wrong adhesive choice, or trapped contaminants that prevent proper bonding.
You’ll see tiles lift, grout crack, or edges delaminate when primers, cleaners, or flexible thinset aren’t used, or when you skip mechanical keying and testing before tiling.
Moisture-related failures and mold risk
If you tile over laminate without addressing moisture risks, you’ll invite swelling, adhesive breakdown, and mold growth that can ruin the installation and the subfloor beneath it.
You should test for moisture, seal gaps, and add a proper vapor barrier or decoupling membrane.
Ignoring leaks, high humidity, or wet-mopping will let mold colonize under tiles and cause costly structural and health problems.
Typical DIY mistakes and how pros prevent them
When DIYers skip proper prep or try shortcuts, the problems show up quickly — loose tiles, cracked grout, or bowed sections where moisture and movement weren’t controlled.
You’ll avoid that by following pro steps and checking details:
- Remove and level unstable laminate.
- Use proper underlayment and membrane.
- Choose the right thinset and grout.
- Control moisture and expansion gaps.
Best Practices and Professional Tips
Decide when a pro is worth it versus a DIY job by weighing your skill level, the subfloor condition, and warranty needs.
Make sure your installation methods and materials meet manufacturer requirements to keep warranties valid, and plan for long-term maintenance like grout sealing and regular inspections.
You can save money by doing prep work yourself and choosing durable, cost-effective materials without cutting corners on adhesives or waterproofing.
When to call a pro vs. DIY
Wondering whether you should tackle tiling over laminate yourself or call a pro?
If your floor is flat, stable, and you’re comfortable with prep, waterproofing, and thinset, DIY can save money.
Call a pro if subfloor issues, moisture problems, unevenness, or complex layouts exist, or if you need warranty-compliant work.
Pros guarantee correct substrate repair, leveling, and durable installation.
How to ensure warranty and manufacturer compliance
If you opt to DIY or hire a pro, make warranty and manufacturer compliance a planning priority before you start work.
Check laminate and tile manufacturer guidelines, keep receipts, and document existing conditions with photos.
Get written approval for any deviations, use recommended underlayments and adhesives, and confirm installer certifications.
Failure to follow specs can void warranties, so verify everything in writing first.
Long-term maintenance advice for tiled surfaces over existing flooring
When you’ve tiled over existing flooring, a regular care routine and the right products will keep the installation sound and attractive for years; prioritize gentle cleaning, prompt grout care, and periodic inspections to catch issues early.
Use pH-neutral cleaners, avoid abrasive tools, reseal grout annually or as needed, fix loose tiles immediately, control moisture with proper ventilation, and document maintenance for warranty and future trades.
Cost-saving tips without compromising durability
Although cutting costs matters, you don’t have to sacrifice longevity—choose durable materials, prep the existing laminate properly, and focus spending on critical steps like a quality underlayment and proper adhesive; those targeted investments prevent costly repairs later.
Shop mid-range tiles, reuse trim where safe, rent tools, and do prep work yourself.
Prioritize warranties and labor for water-prone areas to avoid future expenses.
Timeline and Cost Estimates
You’ll typically spend a weekend to a week on tiling over laminate, depending on prep and drying times.
Expect a ballpark cost that covers materials (underlayment, thinset, tile, grout), labor, and a 10–20% contingency for waste or surprises.
Be aware that substrate repairs, complex tile patterns, or leveling needs can greatly raise both time and cost.
Typical project timeline for tiling over laminate
A straightforward tiling-over-laminate project usually takes 2–5 days for a typical room, depending on prep needs, tile size, and drying times; plan on an extra day or two if you’re converting laminate to a decoupling membrane or leveling compound.
Day one: remove trim, clean, and test adhesion.
Day two–three: prep, apply membrane/leveler if needed.
Day three–five: set tiles, grout, and allow cure.
Ballpark cost breakdown (materials, labor, contingencies)
If you’re budgeting for tiling over laminate, plan costs in three clear buckets: materials, labor, and contingencies. Materials (tiles, mortar, grout) often run $3–$15/sq ft; labor averages $5–$12/sq ft. Set a 10–20% contingency for unexpected repairs or waste. Use the table below to compare rough per-square-foot ranges.
| Item | Typical range |
|---|---|
| Materials | $3–$15/sq ft |
| Labor | $5–$12/sq ft |
Factors that increase time or cost
Because tiling over laminate involves multiple prep and compatibility checks, several specific factors can push your timeline and budget beyond the basic per-square-foot estimates.
Hidden moisture, uneven subfloors, removing trim or thresholds, and reinforcing joists add labor.
Specialized underlayment, leveling compounds, or decoupling membranes increase material costs.
Tight schedules, permit needs, and skilled labor premiums also raise both time and expense.
Before-and-After Case Scenarios
You’ll see how a small bathroom project exposed tricky substrate prep and what lessons saved time and money.
For a large open-plan area, you’ll learn how shifts and expansion gaps change layout and material choices.
And you’ll get quick-win strategies that work for rentals or temporary fixes without major demolition.
Small bathroom: complexity and lessons learned
When renovating a small bathroom, expect hidden complications that can turn a straightforward tile-over-laminate plan into a lesson in problem-solving.
You’ll learn what to watch for—subfloor issues, moisture barriers, and height changes—by walking through real before-and-after scenarios.
You’ll see tests, repairs, underlayment choices, and trim adjustments.
Expect tight tolerances, waste minimization, and decisions that balance durability with minimal floor build-up.
Large open-plan area: challenges with transitions and expansion gaps
Moving from a compact bath to a large open-plan area shifts the problem set—you’re no longer dealing with a few tight tolerances but with long runs, multiple doorways, and visible joins that have to move correctly.
You must plan continuous expansion gaps, coordinate thresholds, and match tile movement to subfloor deflection.
Poor changes cause cracking, lippage, and visual seams; mitigation requires layout, control joints, and flexible adhesives.
Quick wins for rental properties and temporary solutions
Looking for fast, low-cost fixes for a rental? You can use peel-and-stick vinyl tiles or interlocking plank systems over laminate for a temporary, renter-friendly upgrade.
They hide wear, resist moisture, and remove cleanly when your lease ends. Prep by cleaning and leveling; use threshold strips at doorways.
Before-and-after: dull laminate becomes refreshed without permanent changes or landlord headaches.
FAQ
You probably have a few quick questions before you start, like whether you can tile directly over floating laminate or if doing so will void any warranties.
You’ll also want to know how to check your subfloor strength, which underlayment prevents cracking, and how much extra height tiling will add.
Read on and get straightforward answers to each of these points.
Can tile be installed directly over floating laminate without removal?
Can you install tile directly over a floating laminate floor without taking it up? You generally shouldn’t.
Floating laminate moves and lacks proper substrate strength for tile. If you insist, you’d need to secure a rigid, bonded underlayment (cement board or plywood screwed to substrate), eliminate movement, and guarantee floor level.
Most pros recommend removing the laminate for a stable, long-lasting tile job.
Will tiling over laminate void my tile or laminate warranty?
After removing or properly stabilizing a floating laminate for tile, check both product warranties before you proceed: manufacturers often exclude damage caused by improper installation or by altering the designated use, and installing tile over laminate or making structural changes can void coverage for either product.
Contact both manufacturers, get written approval, and keep records. If unsure, remove laminate to preserve warranties.
How do I know if my subfloor is strong enough for tile?
Because tile needs a rigid, stable base, you’ll want to verify your subfloor meets thickness, deflection, and material requirements before installing tile.
Check joist span and flooring thickness (plywood or OSB minimums), confirm deflection is under L/360 for tile, and guarantee no soft spots, water damage, or loose boards.
If unsure, consult a structural pro or installer before proceeding.
What underlayment is best to prevent cracking in tile over laminate?
If you want to prevent tile from cracking over a laminate floor, choose an underlayment that isolates tile from movement and provides a rigid, stable surface—cement backerboard or a modified uncoupling membrane like Schluter‑DITRA are the two best options.
Use backerboard where stiffness is needed; use DITRA to decouple and allow slight substrate movement.
Install per manufacturer instructions, tape seams, and bed tiles with proper thinset.
How much extra floor height will tiling over laminate add?
Want to know how much taller your floor will be when you tile over laminate?
Expect roughly 3/8″ to 3/4″ added for thin-set, tile and grout over a cement backer or uncoupling membrane; thicker tiles or a plywood/replacement underlayment can add 1″–1¼”.
Measure thresholds, door clearances and appliance fit; plan changes and ramping to avoid tripping hazards.