Is Pergo Laminate Flooring Water Resistant Enough for Kitchens and Baths?
You can use Pergo laminate in kitchens and some bathrooms, but it’s water-resistant rather than fully waterproof, so you’ll need to clean spills quickly and avoid standing water. Pick Pergo lines labeled water-resistant or waterproof (Outlast+, Extreme) and follow installation rules like a moisture barrier, sealed seams, proper underlayment, and expansion gaps. With good installation and maintenance it performs well in kitchens and half-baths, and the guidance ahead explains product choice, install steps, and upkeep.
Can Pergo Laminate Flooring Be Used in Kitchens and Bathrooms? Quick Answer
Yes — many Pergo laminate lines offer good water resistance for kitchens and occasional bathroom use, but they’re not fully waterproof like some vinyl options.
You can use Pergo in kitchens and half-baths if you quickly wipe up spills and avoid standing water.
For full bathrooms or areas prone to heavy moisture, choose a waterproof flooring or a Pergo product explicitly rated for wet environments.
Short direct answer (water resistance summary)
While traditional Pergo laminate isn’t fully waterproof, many newer Pergo lines offer strong water resistance that makes them suitable for kitchens and some bathrooms if you manage spills and humidity promptly.
You should know is pergo laminate flooring water resistant varies by product—waterproof cores handle brief exposure, but seams can trap moisture.
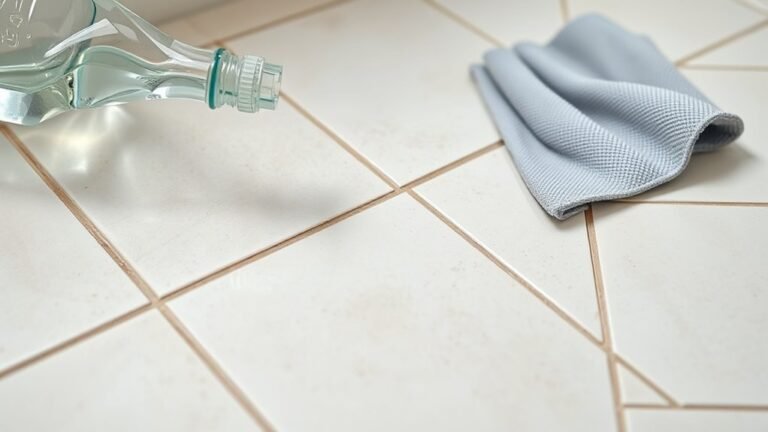
Maintain quick cleanup and proper installation to reduce damage risk.
One-sentence recommendation (when it’s appropriate)
If you keep spills wiped up quickly and install a waterproof Pergo line with properly sealed seams, you can confidently use it in kitchens and in many bathrooms where water exposure is occasional rather than continuous.
Choose a waterproof Pergo product, add tight connections and quality underlayment, avoid steam-heavy rooms, and plan for prompt cleanup and routine maintenance to prevent damage.
What Is Pergo Laminate Flooring? Basic Understanding
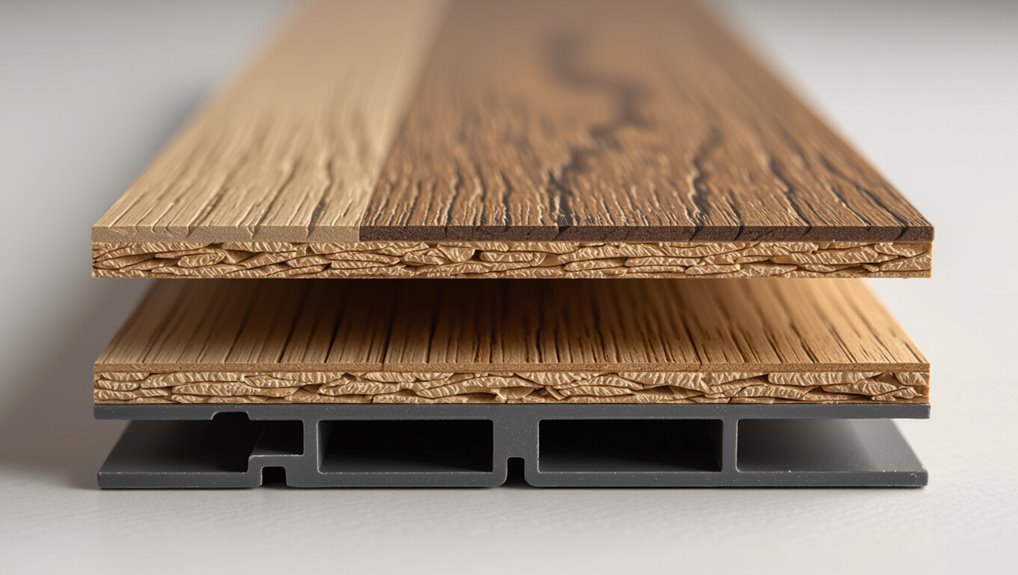
Pergo is a well-known brand that makes laminate flooring by layering a decorative print and protective wear layer over a dense HDF core.
You’ll find its systems use a click-lock mechanism for easy installation plus surface treatments that boost scratch and moisture resistance.
Understanding those key components—wear layer, HDF core, locking system and finishes—helps you judge how Pergo performs in wet areas.
Overview of Pergo brand and laminate construction
When you look at Pergo laminate, you’ll see a flooring system built from multiple layers — a durable wear layer, a printed design film that mimics wood or stone, a high-density fiberboard core, and a stabilizing backing.
Pergo’s reputation rests on consistent manufacturing, variety of styles, and warranties. You’ll find options aimed at higher moisture resistance and designs that balance appearance with practical performance.
Key components: wear layer, HDF core, locking system, surface treatments
You’ve seen how Pergo builds a laminate from layers; now look closer at the parts that determine performance.
You’ll rely on a durable wear layer to resist scratches and stains, an HDF core for stability, a precision locking system to keep joints tight against moisture, and surface treatments or seals that repel water.
Together they dictate durability and moisture resistance.
How Water Resistance Works in Laminate Flooring
You’ll want to know the difference between water-resistant, water-repellent, and waterproof so you can set realistic expectations for Pergo.
Pergo uses surface coatings, tight joints, and engineered bevels to keep moisture out of the core.
Still, seams, exposed edges, and failures at the underlayment are the usual spots where water finds a way in.
Difference between water-resistant, water-repellent, and waterproof
How do those labels differ in everyday use?
You’ll see water-resistant means the floor tolerates occasional spills but isn’t immune to prolonged moisture.
Water-repellent usually indicates surface treatments that make liquids bead and slow absorption.
Waterproof means the core and seams resist water intrusion for extended exposure.
Choose based on room risk: brief spills versus frequent standing water.
How Pergo’s technology addresses moisture (surface coatings, bevels, joints)
Because moisture usually enters at the surface and through seams, Pergo combines protective coatings, engineered bevels, and tight locking joints to keep water out of the core.
You’ll get scratch- and stain-resistant finishes that shed spills, beveled edges that channel liquids away, and precision locks that limit seepage between planks.
These features reduce absorption and extend durability when you maintain prompt cleanup.
Common failure points where water causes damage (seams, edges, underlayment)
When water gets past the surface protections, it usually finds weak spots at seams, exposed edges, and beneath the underlayment. Those areas are where the damage starts.
You’ll see swelling at joints, edge peeling where coatings aren’t continuous, and trapped moisture under the underlayment that fosters cupping and mold.
Prompt drying and sealed connections prevent most failures.
Detailed Evaluation: Pergo Laminate Performance in Kitchens and Baths
You’ll want to look at specific Pergo product lines and their water-resistance ratings to know what’s appropriate for kitchens and baths.
Consider how they handle real-world kitchen scenarios like spills, splashes, and daily humidity versus bathroom situations such as shower or tub exposure and persistent high humidity.
Compare that performance to truly waterproof options like vinyl plank and tile.
Pergo product lines and their water-resistance ratings
Curious which Pergo lines hold up to spills and steam in kitchens and bathrooms? You’ll find specific ratings vary: Pergo Outlast+ offers strong water resistance, Pergo Extreme delivers enhanced protection, and Pergo Sensation performs adequately. Check manufacturer specs for exact limits and installation notes before choosing.
| Line | Rating | Notes |
|---|---|---|
| Outlast+ | High | Waterproof core |
| Extreme | Very High | Enhanced seal |
| Sensation | Moderate | Surface-treated |
Real-world performance: kitchen use cases (spills, splashes, humidity)
Although Pergo laminates aren’t completely impervious, they handle everyday kitchen spills and splashes quite well if you act promptly and follow installation recommendations.
You can mop up spills quickly, use mats by sinks and dishwashers, and maintain proper ventilation to limit humidity.
Seams and edges resist brief exposure, but prolonged standing water or leaks will cause swelling—address issues fast to prevent damage.
Real-world performance: bathroom use cases (showers, tubs, high humidity)
Because bathrooms combine frequent water exposure with high, persistent humidity, Pergo laminate demands more caution there than in kitchens.
You shouldn’t install it inside shower enclosures or where standing water can persist. Around tubs and sinks, seal edges, use proper underlayment, and guarantee ventilation.
Expect swelling risk with prolonged moisture; quick cleanup and humidity control are essential to maintain appearance and structural integrity.
Comparison to waterproof alternatives (vinyl plank, tile)
Having covered where Pergo laminate performs poorly in bathrooms, you’ll want to weigh it against truly waterproof options before deciding. You’ll find vinyl plank resists flooding and feels warm; tile survives heavy moisture but can feel cold and hard. Choose based on tolerance for maintenance, comfort, and long-term risk.
| Option | Feeling |
|---|---|
| Vinyl plank | Cozy relief |
| Tile | Stoic endurance |
How to Install Pergo Laminate in Wet Areas (Step-by-Step)
Before you start, pick a Pergo collection and plank rated for moisture and check the specs for waterproofing and wear layer.
Prep the subfloor carefully and lay an appropriate moisture barrier, then follow locking and joint-sealing practices while considering any necessary slope to direct water.
Finish with proper thresholds, trim, and silicone caulk at junctions to keep water out and guarantee a clean seal.
Step 1 Choosing the right Pergo collection and plank (spec check)
When installing Pergo in a wet area, start by confirming the exact collection and plank you’re using—different lines have different water-resistance specs and installation requirements.
Check manufacturer data for water rating, core type (HDF vs. waterproof core), wear layer, and edge-seal technology.
Match plank dimensions and recommended connections to your room.
Keep spec sheets and warranty details before buying.
Step 2 Preparing subfloor and moisture barrier
Now that you’ve verified the exact Pergo collection and plank specs, prepare the subfloor and moisture barrier so the installation performs in damp conditions.
Remove debris, level any low spots, and guarantee the subfloor is clean and dry.
Install a compatible vapor barrier or underlayment per manufacturer guidelines, overlap seams, and tape edges.
Maintain recommended expansion gaps around perimeters.
Step 3 Installation best practices to minimize water intrusion (joint sealing, slope considerations)
Although Pergo laminate isn’t fully waterproof in every profile, you can dramatically reduce water intrusion by following specific installation practices focused on sealing joints and managing slopes.
You should:
- Seal panel seams with manufacturer-approved seam sealer.
- Stagger joints to avoid continuous seams.
- Slope surfaces toward drains where possible.
- Use tight-fitting underlayment and vapor barrier.
- Inspect and test seams before finishing.
Step 4 Finishing touches and transitions (thresholds, trim, caulk)
Finish strong by installing proper thresholds, trim, and caulk to protect edges and direct water away from the floor.
Fit thresholds at doorways, seal gaps with flexible, mold-resistant caulk, and install base and junction trim to cover expansion gaps.
Make certain trims are elevated slightly to channel spills outward.
Test seals and re-caulk after a week if shrinkage or gaps appear.
Maintenance, Cleaning, and Care to Preserve Water Resistance
To keep Pergo’s water-resistant performance, you should follow simple daily and weekly cleaning routines using only approved cleaners and a damp mop.
When spills happen, wipe them up immediately and dry the area to prevent seepage at joints and edges.
Periodically inspect seams, trim, and thresholds and reseal or repair any vulnerable spots as part of seasonal and long-term maintenance.
Daily and weekly cleaning routines (approved cleaners and methods)
When you sweep or vacuum regularly and spot-clean spills right away, your Pergo laminate will keep its water-resistant performance longer.
Use these daily and weekly habits to protect finish and seams:
- Sweep or vacuum with a soft brush attachment daily.
- Damp-mop weekly with Pergo-approved cleaner.
- Avoid steam mops and abrasive tools.
- Wring mop thoroughly; use minimal water.
- Dry floors promptly after cleaning.
Dealing with spills and accidents (immediate steps)
If a spill happens, act immediately to protect your Pergo laminate’s finish and seams: blot liquids with absorbent towels, working from edges toward the center to avoid spreading.
Wring and replace soaked cloths. For sticky messes, dampen a microfiber cloth with plain water or approved cleaner and wipe gently.
Dry the area thoroughly, check seams for moisture, and ventilate until completely dry.
Seasonal and long-term maintenance (inspections, resealing edges)
Because seasonal changes and everyday wear slowly affect seals and joints, you should schedule regular inspections and address edge wear before moisture finds a way in.
Check seams, shifts, and perimeter gaps every few months; lift trim if needed. Reseal vulnerable edges with manufacturer-recommended sealant, tighten loose planks, and replace damaged boards promptly to maintain long-term water resistance.
Common Problems and Mistakes That Reduce Water Resistance
You can undermine Pergo’s water resistance by making a few common mistakes during selection and installation.
Installing the wrong product in wet-prone areas, skipping a proper underlayment or moisture barrier, leaving standing water to soak in, and failing to seal connections or joints all let moisture reach the core.
Addressing those four issues up front prevents most water-related problems.
Mistake 1 Installing in inappropriate areas or without correct product
When you install Pergo laminate in rooms that routinely get wet—or choose a product not rated for moisture—you’re setting yourself up for swelling, warping, and failed seams.
Don’t fit standard laminate in showers, steam rooms, or poorly ventilated bathrooms.
Pick Pergo models explicitly labeled water-resistant or waterproof for kitchens and baths, follow manufacturer guidelines, and avoid mixing incompatible plank types or trims.
Mistake 2 Poor underlayment or lack of moisture barrier
If your underlayment’s thin, damaged, or missing a proper moisture barrier, moisture can wick up into the planks and compromise Pergo’s water resistance quickly.
You should install a manufacturer-recommended underlayment with an intact vapor barrier, seal seams, and guarantee subfloor flatness.
Skipping or skimping on this layer invites swelling, edge cupping, and joint failure even with water-resistant laminate.
Mistake 3 Letting standing water sit / slow spill cleanup
Because Pergo’s water-resistant wear layer can only fend off brief exposure, letting standing water sit or waiting too long to clean up spills lets moisture work its way into seams and coreboards.
You should blot and mop spills immediately, dry affected areas thoroughly, and use a fan if needed.
Prompt cleanup prevents swelling, staining, and delamination that ruin laminate quickly.
Mistake 4 Improper transitions and unsealed joints
Although Pergo’s planks repel brief spills, improper alterations and unsealed joints create easy entry points for moisture and defeat that protection.
You should install proper connections at doorways and thresholds, seal end joints with recommended caulk, and tighten loose seams.
Inspect seams regularly and address gaps immediately so water won’t wick into the core, swell planks, or warp subflooring.
Prevention, Tips, and Best Practices for Kitchens and Bathrooms
Before you buy, check a product checklist—water-rating, edge-seal type, and warranty—to make sure the Pergo style matches kitchen or bathroom use.
During installation, follow tight seam techniques, proper underlayment, and correct expansion gaps to maximize lifespan.
And in daily use, put absorbent mats at sinks, a waterproof mat under dishwashers or refrigerators, and consider appliance water alarms to catch leaks quickly.
Product selection checklist before purchase
When you’re choosing Pergo laminate for kitchens or bathrooms, focus on moisture-rated products, edge-sealed boards, and a proven warranty that covers water damage; these factors determine real-world performance more than marketing buzz.
- Verify AC rating and water-resistance class
- Check edge-seal type and tongue/groove design
- Confirm warranty covers spills and moisture
- Ask about underlayment compatibility
- Compare real-world reviews and installation limits
Installation tips to maximize lifespan
If you want Pergo to last in kitchens and bathrooms, install it like a barrier against moisture and wear: use the correct moisture-rated product, a continuous edge seal, proper underlayment, and tight, level subfloor prep.
Space expansion gaps per manufacturer, stagger joints, cut and fit boards cleanly, clamp seams, avoid nail-through clicks, and follow adhesive and connection strip instructions for a durable, water-resistant installation.
Practical lifestyle tips (mats, mats under sinks, appliance water alarms)
Once your Pergo is installed correctly, ongoing habits make the biggest difference in keeping water out and wear to a minimum.
Use absorbent mats at entryways and in front of sinks, and place waterproof trays beneath dishwashers and refrigerators.
Fit non-slip pads under rugs to prevent scratching.
Install appliance water alarms and check seals regularly so small leaks never become big problems.
When to Choose an Alternative Flooring Material
If your space faces frequent flooding, heavy moisture, or an upstairs bathroom that’s hard to seal, you shouldn’t use Pergo laminate.
Instead, consider alternatives like vinyl plank (waterproof and low-maintenance), ceramic tile (highly water-resistant but colder and harder), or engineered hardwood (better moisture tolerance than solid wood but still not fully waterproof).
We’ll compare those options’ pros and cons so you can pick what fits your needs and budget.
Scenarios where laminate is not recommended (frequent flooding, upstairs bathrooms without proper sealing)
Because laminate swells and delaminates when exposed to persistent water, you shouldn’t use it in places that see frequent flooding or chronic moisture exposure.
Avoid installing laminate in basements prone to seepage, mudrooms, or ground-floor kitchens with poor drainage.
Don’t put it in upstairs bathrooms unless you guarantee flawless sealing and rigid maintenance; small leaks can ruin the boards and subfloor.
Best alternative options with pros and cons
When constant moisture rules out laminate, you’ll want flooring that stands up to water without sacrificing style or comfort. Consider tile for durability, vinyl for waterproof ease, and engineered hardwood with proper sealing for warmth. Weigh cost, installation, slip resistance, and repairability to match room use and budget.
| Option | Pros | Cons |
|---|---|---|
| Tile | Very waterproof | Cold, grout upkeep |
| Vinyl | Affordable, comfy | Can dent |
| Eng. hardwood | Warm look | Less water-tolerant |
Cost, Warranty, and Lifespan Considerations
You’ll want to weigh price, warranty fine print, and expected lifespan when picking Pergo for kitchens or bathrooms.
Expect quality, water-rated Pergo to run roughly $2–$5 per square foot for materials, with higher-end options costing more.
Check warranty exclusions for water damage and know that with normal kitchen/bathroom use you can typically expect 10–25 years of service depending on product grade and maintenance.
Typical cost range for Pergo laminate suitable for kitchens/baths
Expect to pay roughly $2 to $6 per square foot for standard Pergo laminate suitable for kitchens and baths.
Higher-end water-resistant or hydro‑treated lines run $4 to $8, while premium styles with embossed textures and thicker wear layers hit $8 to $12.
Factor installation, underlayment, and trim into your budget; you’re likely to spend $3 to $10 total per square foot installed.
Warranty limitations related to water damage (what to look for)
Alongside price and installation costs, your warranty will often determine how much water exposure Pergo laminate can practically tolerate before you’re on the hook for repairs or replacement.
Check coverage for moisture, specify accidental spills versus flooding, and note required maintenance and installation methods.
Look for time limits, pro-rated clauses, exclusions for subfloor or standing water, and required proof of purchase and photos.
Expected lifespan under normal kitchen/bathroom use
1–2 decades is a realistic range for Pergo laminate in a kitchen or bathroom under normal use, but actual lifespan depends on traffic, moisture control, and how well you follow the warranty’s installation and maintenance rules.
You can extend service life by wiping spills, using mats in high-traffic zones, maintaining humidity, and replacing damaged planks promptly to prevent water migration and warranty issues.
Frequently Asked Questions
You probably have specific questions about Pergo’s water performance, like whether it’s fully waterproof or only water resistant and how it handles standing water or shower humidity.
You’ll also want to know if it’s safe to install next to or inside a shower alcove, and whether you can refinish or reseal it to boost protection.
Below are concise answers to those common concerns.
Is Pergo laminate waterproof or just water resistant?
Wondering whether Pergo laminate is truly waterproof or merely water resistant? You’ll find most Pergo lines offer strong water resistance—some are marketed as waterproof—thanks to sealed surfaces and tight joints.
That said, performance varies by product; manufacturers still warn against prolonged standing water.
Check specific model specs and warranties to confirm waterproof claims before using it in moisture-prone areas like kitchens or bathrooms.
Can Pergo be installed in a shower alcove or directly next to a tub?
Can Pergo go inside a shower alcove or right up against a tub?
You shouldn’t install Pergo where it will be submerged or exposed to constant spray.
Pergo can be placed adjacent to a tub if you seal edges, maintain proper connections, and prevent water intrusion.
For shower interiors and areas with heavy splash, choose fully waterproof materials designed for direct water exposure.
How long can Pergo laminate withstand standing water?
How long will Pergo laminate tolerate standing water before it fails?
You’ll get variable results: modern Pergo with water-resistant cores can handle brief puddles—hours to a day—without immediate failure.
Prolonged exposure, especially over seams or damaged edges, allows water to penetrate and swell the core within days.
Promptly remove standing water and dry seams to extend performance and avoid costly replacement.
Will humidity from showers warp laminate flooring?
If your bathroom sees regular hot showers, humidity can affect laminate flooring—especially older or non-water-resistant Pergo—by causing edge swelling, cupping, or joint separation over time.
You can minimize risk by ensuring strong ventilation, keeping doors closed to limit moisture spread, wiping up surface condensation, and choosing moisture-rated Pergo.
Persistent high humidity still raises the chance of warped boards and loose seams.
Can I refinish or reseal Pergo laminate to improve water resistance?
Wondering whether you can refinish or reseal Pergo to boost its water resistance?
You can’t sand and refinish laminate like hardwood because there’s no solid wood layer.
Some manufacturers offer refresh kits or surface sealers, but they’re cosmetic and offer limited moisture protection.
Your best options are replacing damaged planks, using proper underlayment, and choosing Pergo models rated for water resistance.