How to Deep Clean a Tile Floor (Complete Guide)
You can deep clean tile floors by prepping the area, sweeping and vacuuming, testing cleaners, and matching solutions to your tile and grout type. Pre-treat stains, scrub grout with nylon brushes or a machine scrubber, rinse thoroughly, and dry with microfiber towels and good airflow. Seal grout after it’s fully dry and adopt regular sweeping and mopping to prevent buildup. Follow the full guide for step-by-step techniques, stain fixes, and when to call a pro.
How to Deep Clean Tile Floors: An Overview
Wondering where to start with a tile floor that hasn’t seen a proper clean in a while? You’ll begin by evaluating tile type, grout condition, and stains so you choose safe cleaners and tools.
Respect historical references about traditional materials and methods if you’re working on antiques, and note cultural significance when restoring tiles in heritage settings.
You’ll remove loose debris, test cleaners in a discreet spot, and prioritize grout care to prevent damage.
Plan steps, gather supplies, and set realistic time blocks.
With this overview, you’ll tackle deeper cleaning confidently while protecting tile integrity and context.
Quick Answer: Deep Clean Tile Floors in 6 Steps
Start by prepping the area: clear furniture, sweep debris, and protect nearby surfaces.
Pick the right cleaning solution for your tile and grout—commercial cleaner, diluted vinegar, or a pH-neutral option depending on the material.
Finish by scrubbing grout and tiles, then rinse thoroughly and let everything dry.
Prep The Area
Why clear the space first? You’ll move furniture, rugs, and pet items so you can inspect tile patterns and spot grout discoloration. Clear access helps you vacuum and sweep thoroughly without obstacles.
| Task | Why | Time |
|---|---|---|
| Remove furniture | Prevent damage, expose edges | 5–15 min |
| Roll up rugs | Access entire floor | 2–5 min |
| Contain pets | Safety, avoid interference | 1–3 min |
| Check corners | Find hidden dirt | 3–7 min |
| Gather tools | Mop, broom, bucket | 2–4 min |
Finish by marking problem areas so you can treat them next.
Choose Cleaning Solution
How strong of a cleaner you choose depends on your tile type and how grimy the grout is, so match the solution to the job before you mix anything.
For glazed ceramic or porcelain, use a mild pH-neutral cleaner or diluted vinegar for routine cleaning; harsher acids can dull finishes.
For natural stone, pick a stone-safe, pH-neutral product to avoid etching.
For stubborn grout stains, try a targeted grout cleaner or oxygen bleach following label directions.
Always spot-test.
Plan solutions as part of your cleaning schedules and overall tile maintenance to prevent frequent deep cleans and protect surfaces long term.
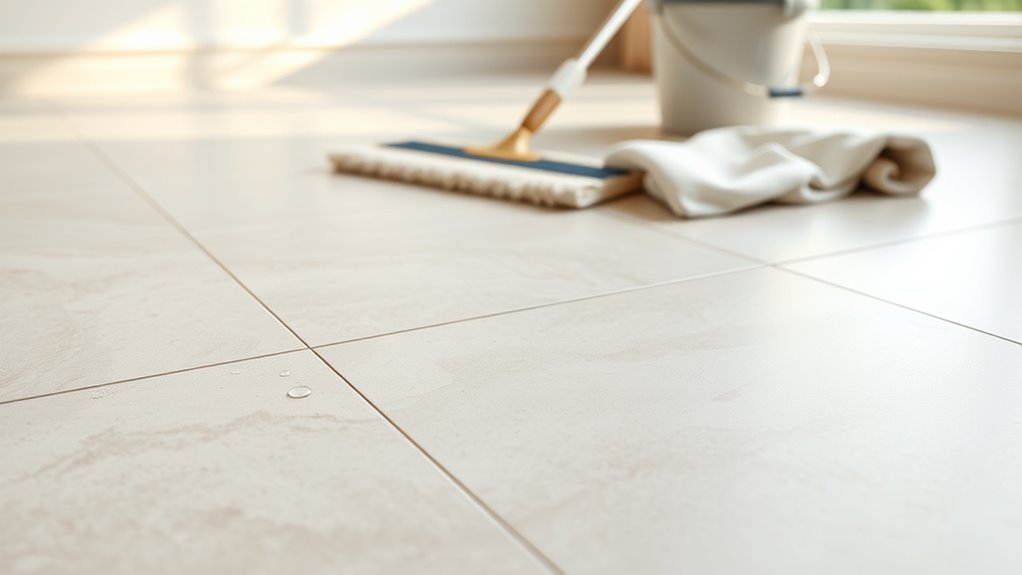
Scrub And Rinse
With your cleaning solution chosen and tested, it’s time to scrub and rinse so the tile and grout actually look clean. Start in a corner and work outward, using a stiff-bristled brush for grout and a microfiber mop for tile.
Scrub grout lines in short, firm strokes to lift dirt and color variations, then wipe tiles following tile patterns to avoid streaks. Rinse frequently with clean water, changing buckets when cloudy.
For stubborn stains, repeat spot-scrubbing and let the solution sit briefly before rinsing. Dry with a clean towel to prevent residue and highlight true color and pattern contrast.
When to Deep Clean vs. Routine Mopping
You should deep clean when you can see built-up soil or grout staining that routine mopping won’t remove.
For day-to-day grime, stick to regular mopping on a schedule that matches foot traffic—daily for high-traffic areas, weekly or biweekly for low-traffic spaces.
Use visible residue and traffic patterns to decide when a deeper treatment is needed.
Visible Soil Vs. Regular Dirt
Although both look similar at first glance, visible soil and regular dirt demand different responses. You’ll spot visible soil as clumps, stains, or color variation that sit on grout and tile patterns; regular dirt is fine dust and tracked particles.
Treat visible soil with targeted scrubbing, enzyme cleaners, or steam to lift residues. Routine mopping handles everyday dust and light grime.
Learn to inspect closely: if you see staining, texture, or buildup, deep clean. If residue wipes away with a damp mop, stick to routine care.
- Visible soil: stubborn, localized
- Regular dirt: loose, widespread
- Deep clean: targeted methods
- Mop: maintenance only
Frequency Based On Traffic
Spotting visible soil tells you when to scrub, but traffic patterns tell you how often to schedule those deep cleans. If an entryway or kitchen sees heavy footfall, you’ll deep clean every 1–2 weeks; moderate-traffic rooms can wait 4–6 weeks. Use routine mopping weekly elsewhere to control dust and spills.
Watch color patterns—darker streaks or grout discoloration signal more frequent attention. Consider tile durability: softer or worn tiles need gentler, less frequent scrubs to avoid damage, while durable tiles tolerate more frequent deep cleaning.
Adjust based on pets, kids, and seasonal mud to maintain appearance and longevity.
Gather These Tools and Supplies First
Before you start scrubbing, gather the right tools and supplies so the job goes faster and cleaner. You’ll want sturdy basics that respect tile materials and reflect historical trends and cultural influences in cleaning habits—some tools endure because they work. Pick durable, nonabrasive items and the right protective gear so you don’t damage grout or tile finishes.
- Microfiber mop and bucket with wringer
- Soft-bristle brush and grout brush
- Rubber gloves and knee pads
- Neutral pH cleaner (store-bought) and spray bottles
Organize everything nearby so you can move efficiently and avoid interruptions.
Safe Homemade Tile and Grout Cleaners
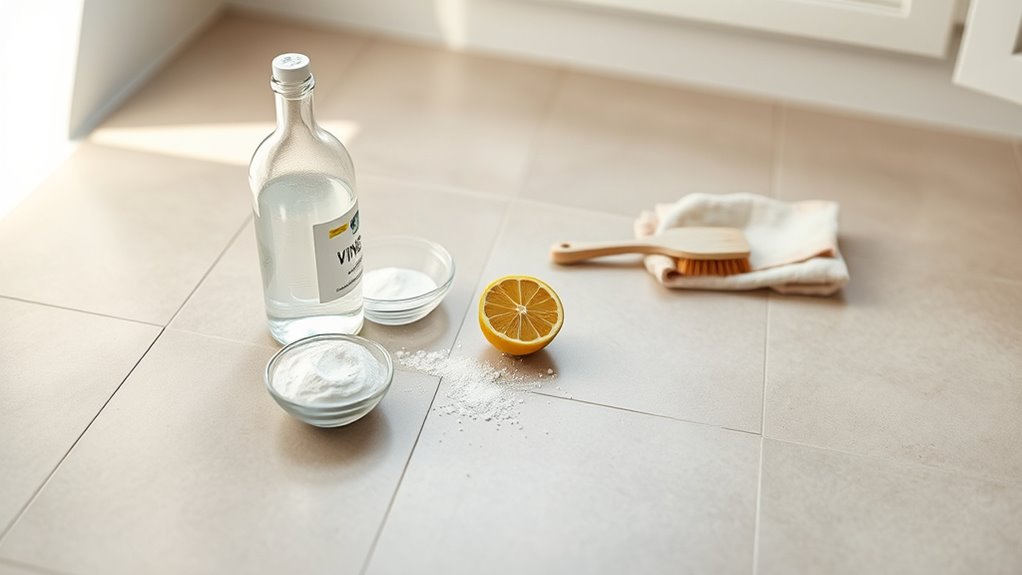
You can tackle grout grime with simple, safe mixtures you make at home. Try a paste of baking soda and vinegar for surface stains.
Use hydrogen peroxide solutions for tougher discoloration. Always spot-test first and rinse thoroughly after cleaning.
Vinegar And Baking Soda
If you prefer a natural, cost-effective approach, vinegar and baking soda make a powerful pair for cleaning tile and grout. You’ll enjoy vinegar benefits like cutting grease and brightening tile, while baking soda uses include gentle abrasion and odor neutralizing.
Mix a paste for grout or a diluted vinegar solution for tiles, apply, let sit briefly, then scrub with a brush. Rinse thoroughly and dry to prevent residue.
- Use 1:1 water and white vinegar for tiles
- Make a baking soda paste for grout stains
- Test a small area first
- Ventilate the room while cleaning
Hydrogen Peroxide Solutions
While not as acidic as vinegar, hydrogen peroxide works as a safe, effective bleach alternative that kills mold, lifts stains, and brightens grout without harsh fumes. You’ll mix 3% hydrogen peroxide with baking soda into a paste for grout or dilute it 1:1 with water for general tile.
Apply the paste, scrub with a brush, let sit 10–15 minutes, then rinse. For stubborn stain removal, repeat or combine peroxide with a few drops of dish soap.
Always spot-test and ventilate. Don’t mix with vinegar or bleach. Store solutions in opaque containers away from heat and light.
Choosing a Commercial Tile Cleaner

Picking the right commercial tile cleaner makes a big difference in results and safety. You’ll want a product matched to your tile type and grout, one that won’t dull color options or damage intricate tile patterns. Look for pH-appropriate formulas, clear usage instructions, and reputable brands with good reviews.
Avoid overly abrasive compounds if your tile is glazed or delicate.
- Check pH and compatibility with your tile material
- Prefer concentrated formulas you can dilute correctly
- Choose cleaners with clear safety and disposal guidance
- Consider scent-free or low-odor options for indoor use
How to Test Cleaners on Tile and Grout
Before you apply a cleaner across the whole floor, test it in an inconspicuous spot to confirm it won’t discolor or damage the tile or grout. Dab a small amount, wait the manufacturer’s recommended time, then blot and rinse.
Inspect for color change, haze, or grout erosion under different light and with magnification if needed. Repeat for other color options and finishes you have, since one product can affect porcelain, ceramic, or natural stone differently.
Test near varied tile patterns and grout lines to verify uniform results. If any change appears, don’t use that cleaner on the rest of the floor.
Clear the Room and Protect Surfaces
Before you start scrubbing, move furniture out of the room or to the center and pile it on protective pads so you have full access to the tile.
Cover nearby surfaces—baseboards, countertops, and vents—with drop cloths or plastic to keep cleaners and splashes off them. That prep will save time and prevent damage while you deep clean.
Move Furniture Out
Once you’ve cleared a path, start moving furniture out of the room or to the center and cover it—so you can work freely and keep pieces from getting scratched or wet.
Plan furniture arrangement with your room layout in mind so heavy items clear doorways and vents.
Lift with knees or use sliders; don’t drag legs across tile.
Label stacked items and keep a clear walkway to prevent trips.
Protect delicate legs and avoid overloading temporary piles.
- Use furniture sliders for heavy sofas
- Stack chairs and small tables safely
- Keep essentials nearby in a box
- Mark fragile items and routes
Cover Nearby Surfaces
While you move furniture and clear the room, cover nearby surfaces to protect them from water, cleaners, and grit. Lay drop cloths or plastic sheeting over counters, baseboards, and low shelving, securing edges with painter’s tape so cleaners don’t seep under.
Drape delicate decorative accents with soft cloths or bubble wrap and move small items to another room. Protect door thresholds and vents with cardboard if you’ll rinse heavily.
For wall-mounted pieces, temporarily remove them or cover backs and frames. These simple surface protection steps save time and prevent damage, letting you focus on a thorough, worry-free tile deep clean.
Dry Prep: Sweep, Vacuum, and Dust
Because grit and dust chew through grout and dull tile surfaces, start by thoroughly sweeping the floor with a soft-bristle broom, then follow with a vacuum (use a hard-floor setting or brush attachment) to pick up what the broom misses.
Next, dust baseboards, door thresholds, and under cabinets so dirt doesn’t resettle.
Check grout lines for trapped debris before wet cleaning.
Consider how Color options and tile patterns affect where dirt shows, letting you target high-visibility areas first.
- Sweep corners and edges carefully
- Vacuum slowly in overlapping passes
- Use a microfiber dust mop for fine particles
- Empty vacuum canister or bag before proceeding
Pre-Treat Heavy Stains and Greasy Spots
First, identify whether the mark is oil, food, rust, or something else so you can pick the right treatment.
Use a commercial degreaser for greasy spots and a targeted stain remover for things like rust or dye.
For stubborn areas, pre-soak the spot so the cleaner can break down grime before you scrub.
Identify Stain Type
How bad is the stain and what caused it? You’ll start stain identification by inspecting color, texture, and age — that tells you whether it’s organic, oil-based, or mineral. Note any color fading around the mark; fading hints at sun or chemical exposure rather than fresh grease.
- Check texture: sticky, powdery, or oily.
- Smell briefly: rancid, sweet, or neutral.
- Tap grout: crumbly grout can absorb stains deeper.
- Test a hidden spot: mild cleaner to observe reaction.
Once you’ve identified the type, you’ll choose the right pretreatment and avoid damaging the tile.
Use Proper Degreasers
Now that you know what kind of stain you’re facing, treat greasy or oil-based spots with a dedicated degreaser before general mopping.
Choose a product labeled for tile and compatible with your floor’s finish; test a small area near a seam to verify it won’t dull tile patterns or alter grout colors.
Apply per instructions, working the degreaser into the spot with a soft brush or microfibre pad, letting it dwell briefly to break down oils.
Wipe or extract residue thoroughly, then rinse the area to remove any chemical film so your cleaning solution can work effectively.
Pre-Soak Trouble Spots
When you’re dealing with persistent stains or grime that resisted the degreaser, pre-soaking gives the cleaning agents time to penetrate and lift the soil instead of just sitting on the surface.
You’ll target greasy spots and oil stains by applying a concentrated cleaner, covering with plastic to keep it wet, and letting it dwell 15–30 minutes.
For colored grout or delicate tiles, test first to avoid altering grout color or finish.
After soaking, agitate with a brush and rinse thoroughly.
Consider sealing techniques after full drying to protect cleaned areas and prevent future deep stains.
- Apply concentrated cleaner
- Cover with plastic wrap
- Agitate with nylon brush
- Rinse and dry then seal
Step 1 : Apply Cleaner to Tile and Grout
Before you scrub, apply a suitable cleaner across the tile and grout so it can break down grime and stains. Choose a pH-appropriate cleaner for your tile type and dilute per instructions. Pour or spray evenly, working in manageable sections.
Let the solution dwell the recommended time to loosen dirt; don’t let it dry. Use appropriate cleaning equipment like a mop for tile surfaces and a spray bottle for targeted areas.
For stubborn discoloration, spot-treat with a stronger formula designed for stain removal. Rinse thoroughly afterward to remove residue, then blot or dry so the floor’s ready for scrubbing.
Step 2 : Scrub Grout Lines by Hand
With the cleaner set and rinsed, grab a stiff nylon-bristled brush and focus on the grout lines by hand. You’ll work small sections, scrubbing firmly to lift soil without damaging grout. Rinse frequently and inspect progress; repeat on stubborn stains. After drying, consider grout sealing to protect your results and reduce future work. Don’t skip tile polishing later for a consistent finish.
- Work in 2–3 foot sections for control
- Use circular motions on stained spots
- Keep rinse water clear to avoid redepositing dirt
- Wear gloves and kneepads for comfort and safety
Step 3 – Decide: Machine or Manual Scrubbing
Now you’ll choose between a machine scrubber—fast and consistent for large areas—or manual scrubbing, which gives you precise control on stubborn spots.
Consider machine scrubbing for open floor plans and manual for tight corners or delicate tiles, and don’t forget you can combine both to get the best results.
Decide based on floor size, grout condition, and how much effort you’re ready to put in.
Machine Scrubbing Pros
If you’re tackling a large or heavily soiled tile floor, a machine scrubber can save time and effort while delivering more consistent results than hand-scrubbing. You’ll cover wide areas fast, loosen embedded dirt in grout colors that contrast with tiles, and reduce repetitive strain.
Machines adapt to varying tile patterns and pressure needs, giving even agitation without damaging surfaces when used properly. Choose the right pad and solution, test a corner, and plan passes to avoid streaks.
- Faster cleaning for big spaces
- Better grout revitalization
- Consistent pressure across patterns
- Less physical strain and fatigue
Manual Scrubbing Benefits
Though it takes more elbow grease, manual scrubbing gives you precise control over pressure, cleaning agents, and trouble spots so you can target stubborn grout stains and delicate tiles without risking damage.
You’ll feel resistance and adjust strokes, choosing brushes and pads that suit tile texture. Manual scrubbing lets you concentrate on grout maintenance, working cleaner into joints and rinsing thoroughly to prevent residue.
It’s quieter, low-cost, and ideal in tight areas or around fixtures. Expect more time and effort, but you’ll preserve finishes and remove set-in grime where machines might skip or be too aggressive.
When To Combine Methods
When tackling a large or stubbornly stained tile floor, choose a hybrid approach so you get the speed of a machine and the precision of handwork where it matters. You’ll run a scrubber for broad grime, then switch to hand tools for grout lines, corners, and pet stain spots.
Reserve manual effort for delicate tiles or areas a machine can’t reach. During seasonal cleaning, combine methods to tackle accumulated dirt without overworking surfaces.
Plan time: machine first, inspect, then spot-scrub. This saves effort, protects finishes, and ensures thorough results where detail counts.
- Machine for open areas
- Hand-scrub grout
- Target pet stain spots
- Seasonal deep touch-up
Step 4 : Rinse Tile Thoroughly
After scrubbing, don’t leave cleaner residue on the tile—rinse thoroughly to remove soap, dirt, and loosened grime. Fill a bucket with clean, warm water and mop or wipe in sections, changing water often so you’re not spreading soil.
For textured tile patterns, use a soft brush rinse to get into grooves. Pay attention to grout color as you rinse; darker grout may hide residue while light grout shows it, so rinse extra until water runs clear.
Finish by flushing corners and edges where buildup hides. Repeat rinsing if any soapy film remains before moving on.
Step 5 : Dry to Avoid Streaks and Spots
After rinsing, let the floor air dry thoroughly so most moisture evaporates on its own.
Then wipe remaining damp areas with a microfiber cloth to prevent streaks and lift residue.
Pay attention to corners and grout lines so water spots don’t form.
Air Dry Thoroughly
Want a streak-free shine? Let the floor air dry thoroughly after rinsing to prevent streaks and spots. Good air drying and moisture control stop residue buildup and mildew.
Keep traffic off the floor and boost circulation for faster, even drying.
- Open windows and doors to increase airflow.
- Use fans set low to avoid blowing dust onto tiles.
- Remove rugs and keep pets off until fully dry.
- Check grout lines for trapped moisture and ventilate longer if needed.
You’ll notice fewer streaks and a clearer finish when you prioritize proper air drying and moisture control.
Wipe With Microfiber
When the floor’s surface is mostly dry, grab a clean microfiber mop or cloth and wipe in overlapping strokes so you lift remaining moisture and prevent streaks. Work systematically across the room, changing or rinsing the cloth as it gets dirty to avoid smearing grit.
Microfiber cloths trap water and tiny particles better than cotton, so you’ll see fewer streaks and faster results. Pay attention to grout lines and corners where water hides.
For regular upkeep, adapt your cleaning frequency to traffic: weekly in busy areas, monthly in low-use rooms. Finish with a quick inspection for any missed wet spots.
Prevent Water Spots
How do you keep that freshly cleaned tile from developing water spots? You’ll dry promptly and consistently so tile patterns and grout colors stay true. After rinsing, use an absorbent microfiber mop or towels, working in small sections and following grout lines to prevent streaks. Finish with a squeegee for large areas, then buff lightly to remove residue.
Avoid letting sunlight bake droplets, which creates mineral halos.
- Use a clean, lint-free microfiber towel.
- Squeegee toward a drain or exit.
- Change towels when damp to avoid smearing.
- Dry grout lines thoroughly to preserve grout colors.
Remove Soap Scum and Mildew From Bathroom Tile
Because soap scum and mildew build up in damp bathroom corners, you’ll need targeted cleaners and a firm routine to remove them effectively. Start by ventilating the room and sweeping loose debris.
For soap scum removal, apply a vinegar-water solution or a commercial descaler, let it sit five to ten minutes, then scrub with a nylon brush.
For mildew prevention, dry grout and corners after each use and use a diluted bleach or hydrogen peroxide spray on stubborn spots, letting it penetrate before rinsing.
Rinse thoroughly, dry with a microfiber cloth, and repeat weekly to keep tiles bright and sanitary.
Remove Grease and Baked-On Food From Kitchen Tile
If grease and baked-on food have darkened your kitchen tile, tackle them quickly with the right cleaners and tools to prevent staining and sticky residue. Start by sweeping, then apply a degreasing solution (dish soap diluted in warm water or a commercial degreaser). Let it sit briefly, scrub with a nylon brush, and rinse.
For stubborn spots, use a paste of baking soda and water or a vinegar spray on ceramic — avoid acidic methods on sensitive stone.
Match cleaning intensity to tile patterns and grout colors so you don’t cause discoloration.
- Sweep or vacuum first
- Use degreaser and scrub
- Rinse thoroughly
- Spot-treat stubborn grime
Revive Dull or Etched Tile Surfaces Safely
When tile looks dull or has light etching from cleaners or foot traffic, you can often restore some shine without damaging the surface by using the right products and gentle techniques.
Start by testing a mild, pH-neutral cleaner on an inconspicuous area. Use a non-abrasive pad and circular motions to polish; avoid harsh acids or abrasive powders that worsen etching.
For glazed tiles, a polishing compound made for ceramics can help. For natural stone, use a product labeled safe for that stone.
Work along tile patterns and watch grout colors to avoid staining or uneven shine. Rinse and buff dry.
Deep-Clean Porous Grout and Reseal When Needed
Although grout is porous and traps dirt, you can restore its appearance and protect it by deep-cleaning thoroughly and resealing as needed. Start by vacuuming loose debris, then scrub grout lines with a pH-neutral cleaner and a stiff brush to lift embedded grime from this porous material. Rinse well and let grout dry completely—often 24–48 hours—before applying a quality sealer.
Deep-clean grout with a pH-neutral scrub, rinse thoroughly, then allow 24–48 hours drying before sealing for lasting protection
Follow the sealing process instructions for coverage and cure time to guarantee lasting protection.
- Test cleaner and sealer in a small area first
- Use proper ventilation during application
- Reapply sealer every 1–3 years as needed
- Address stains promptly to avoid permanent discoloration
What to Do When Mold Won’t Come Off Grout
Even after deep-cleaning and resealing, stubborn mold can cling to grout and resist ordinary scrubbing. If mold removal won’t budge, try a targeted approach: apply a commercial mold remover or a bleach solution (1 part bleach to 10 parts water), let it sit 10–15 minutes, then scrub with a stiff nylon brush. Rinse thoroughly and dry completely.
For porous or damaged grout, remove and regrout small sections, then perform grout sealing to prevent recurrence. Improve ventilation and fix leaks to stop moisture buildup.
Repeat treatment only as needed and wear gloves, eye protection, and a mask for safety.
Eco-Friendly Tile Cleaners That Actually Work
Looking for effective, low-toxicity options for tile cleaning? You can clean thoroughly without harsh chemicals. Choose eco friendly mixes and targeted tools for strong stain removal while protecting grout and finishes. Test any recipe on a small patch first.
- Vinegar and water (diluted 1:10) for routine degreasing and light stains
- Baking soda paste for grout scrubbing and stubborn spots
- Castile soap solution for general cleaning and shine
- Hydrogen peroxide spot treatment for organic stains and mildew
Rinse well, dry tiles, and repeat treatments only as needed to avoid residue and wear.
How Often to Deep Clean Each Room
When you plan deep-cleaning schedules, prioritize high-traffic and moisture-prone rooms more often than low-use spaces.
Aim to deep clean kitchens and entryways every 4–6 weeks because spills, grit, and plant decor soil accumulate.
Deep-clean kitchens and entryways every 4–6 weeks—spills, grit, and plant soil build up quickly.
Bathrooms need deep cleaning every 2–4 weeks to combat grout buildup and moisture damage, and to keep lighting fixtures free of grime.
Living areas and bedrooms can be done every 2–3 months unless you have pets or heavy foot traffic, then tighten the schedule.
For seldom-used rooms, a seasonal deep clean suffices.
Adjust frequency for allergies, pets, and visible dirt.
Daily and Weekly Habits to Keep Tile Cleaner
Because small, regular actions prevent big messes, adopt simple daily and weekly habits to keep tile looking its best. You’ll preserve finish, prevent grit buildup, and keep grout from darkening.
Sweep or vacuum daily, spot-mop spills immediately, and use a microfiber mop with pH-neutral cleaner weekly. Rotate mats and furniture to avoid uneven wear so your color options and tile textures stay consistent. Inspect grout lines while you clean to catch stains early.
- Sweep or vacuum high-traffic areas every day
- Spot-clean spills right away with a damp cloth
- Weekly mop with a gentle, pH-neutral solution
- Rotate rugs and move furniture periodically
Best Grout Sealers and How to Apply Them
If you want grout that resists stains and moisture, choose a high-quality sealer matched to your grout type and traffic level. Pick penetrating sealers for sanded grout and membrane sealers for high-moisture areas.
Test a small patch to verify grout color meets expectations. Clean and dry grout thoroughly, then apply sealer with a brush or applicator bottle, working in small sections.
Test a small area first, then clean and dry grout thoroughly before applying sealer in small sections.
Wipe excess from tile within the product’s specified time to avoid haze. Allow full cure per manufacturer instructions before foot traffic.
Reapply sealers every 1–5 years depending on wear, using recommended sealing techniques for best protection.
Protect Tile: Mats, Shoe Rules, and Furniture Pads
Sealing grout helps prevent stains, but everyday habits protect tile just as much—so set up simple defenses like mats, shoe rules, and furniture pads to keep floors looking new.
Place walk-off mats at entries to trap grit that scratches tile patterns, and use indoor-only shoes or slippers to cut dirt transfer.
Add felt pads to furniture legs and move heavy items occasionally to avoid wear lines.
Monitor grout coloration; replace mats or clean pads when they get dirty so they don’t redeposit grime.
- Entry and bath mats
- No-outdoor-shoe policy
- Felt furniture pads
- Washable appliance pads
Common Mistakes That Damage Tile or Grout
When you skip proper care or grab the wrong tools, tile and grout can suffer permanent damage. You’ll hurt surfaces by using acidic cleaners on natural stone, abrasive pads on softer tile materials, or too-hot steam that weakens grout.
Avoid bleach on colored grout or harsh dyes that strip color patterns. Don’t scrub with metal brushes or drag heavy furniture without pads—chips and scratches add up.
Overusing sealers creates sticky buildup; under-sealing lets stains set. Test cleaners in an inconspicuous spot first, follow manufacturer guidance, and address spills promptly to protect your floor’s finish and longevity.
DIY vs. Pro Cleaning: Cost and Time Estimates
Deciding between DIY and hiring a pro comes down to how much time, money, and elbow grease you’re willing to invest.
You can deep clean most tile patterns yourself with basic tools; expect 2–6 hours for an average room and minimal cost for cleaners.
Pros charge $0.50–$3.00 per square foot depending on condition, travel, and sealant.
Grout color affects time — darker, stained grout may need more scrubbing or recoloring.
Weigh savings against convenience, equipment rental, and risk of damage.
- DIY: lower cost, more time
- Pro: faster, pricier
- Equipment rental options
- Supplies and prep needed
When to Call a Pro: Signs You Need Expert Care
If your tile or grout shows persistent stains, crumbling grout, widespread discoloration, or you spot loose or cracked tiles, call a pro—these signs mean the problem exceeds basic DIY care and risks bigger damage or costly repairs.
You should also seek help if adhesive failures alter tile patterns, if grout color won’t match after patching, or if large sections feel uneven.
Pros assess substrate issues, moisture intrusion, and structural movement you can’t fix safely.
Hire someone when repairs affect layout, warranty, or resale value, or when you lack tools or confidence to prevent further damage.
Troubleshooting Stubborn Issues and Final Touch-Ups
Calling a pro makes sense for serious structural or substrate problems, but you can tackle many stubborn stains and finishing details yourself with the right approach.
Inspect tile patterns for damaged or loose tiles; lift and replace as needed.
Inspect tile patterns regularly; lift and replace any damaged or loose tiles to keep surfaces sound and even.
Test grout color match before regrouting patches.
Use poultices for oil or rust, enzyme cleaners for organic stains, and a steam cleaner for deep grime.
Seal grout after repairs to protect color and ease maintenance.
Finish by buffing tiles dry and checking progressions.
- Test a small area first
- Match grout color carefully
- Replace damaged tiles smartly
- Seal and buff for durability
Frequently Asked Questions
Can Tile Cleaners Damage Radiant Floor Heating Systems?
Yes — you can damage radiant floor heating if you use harsh cleaning chemicals; you should prioritize radiant safety by choosing pH-neutral, manufacturer-approved cleaners and avoiding acidic or abrasive products that could corrode wiring, tubing, or floor finishes.
Can Deep Cleaning Change Tile Color or Finish Permanently?
Yes — if you use abrasive scrubbing, harsh chemicals, or improper tile polishing, you can change color or finish permanently; coincidentally, skipping grout sealing or protective steps often accelerates that irreversible dulling or etching.
Is It Safe to Use Bleach Around Pets and Infants?
No, you shouldn’t use bleach around pets or infants; it’s not pet safe cleaning. Instead, use natural disinfectants like vinegar (diluted), hydrogen peroxide, or steam, ventilate well, keep them away until surfaces fully dry.
How Do I Remove Adhesive Residue From Tile Surfaces?
You’ll soften adhesive with heat or a citrus-based solvent, then scrape gently with a plastic scraper. For stubborn spots, apply adhesive removal product, scrub for residue cleaning, rinse thoroughly, and dry to prevent reapplication.
Can I Deep Clean Tile Floors in Cold or Freezing Temperatures?
Yes — you can, but cold weather slows cleaners and water can freeze; you’ll need gentler cleaning techniques, warm solutions, fast drying, and protected temperatures so you don’t trap ice like a frozen mirror on your tiles.
Conclusion
Deep cleaning tile floors keeps your home healthy and looking great — and it’s easier than you think. Experts say grout can harbor up to 100,000 bacterial cells per square centimeter, so deep cleaning matters. Follow the steps, use the right tools and cleaners, and avoid common mistakes to protect tile and grout. If stains or damage persist after your best effort, call a pro to restore the floor safely and efficiently.